Odoo Office 365 Calendar Connector

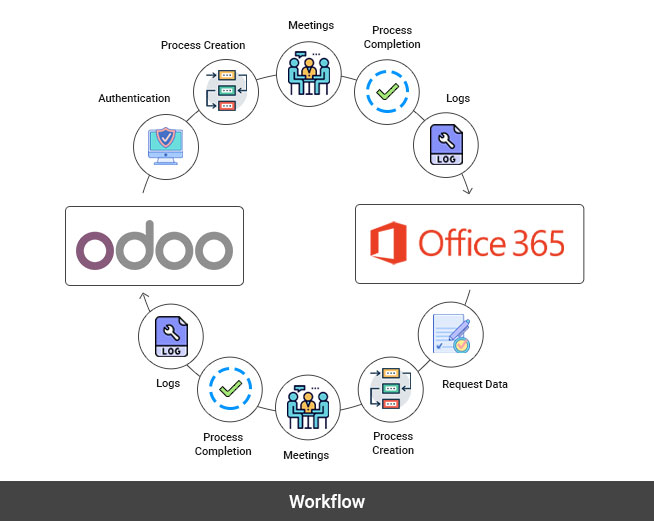
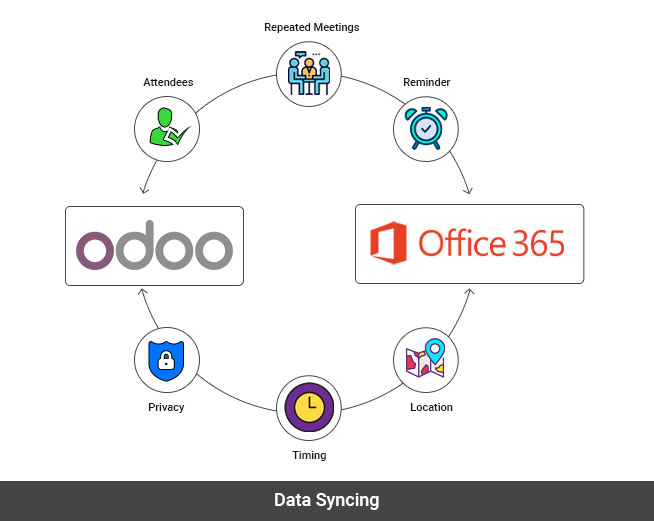
Ksolves Office 365 Calendar offers a two way synchronization to sync your schedules, meetings and events in Odoo and Office 365 accounts through a simple click. Combined with Ksolves Office 365 Base features, it provides a way to comprehensively manage your schedules and recurrent meetings without any miss.

Workflow
Features
- Support for recurring events in Office 365 and Odoo
- Configure and restrict syncing options
- Advanced search and filter mechanisms for logs analysis
- Manageable through a single console along with other Ksolves Office 365 apps
- User can sync according to their choice with the help of filters
- Makes use of powerful features of Office 365 Base
- Easily sync new items in Office 365 to Odoo and vice versa
- Ability to select which way to sync through a simple click
- Ability to sync only latest events
- Ability to continue the sync process where you left last time.
Setup
Authentication
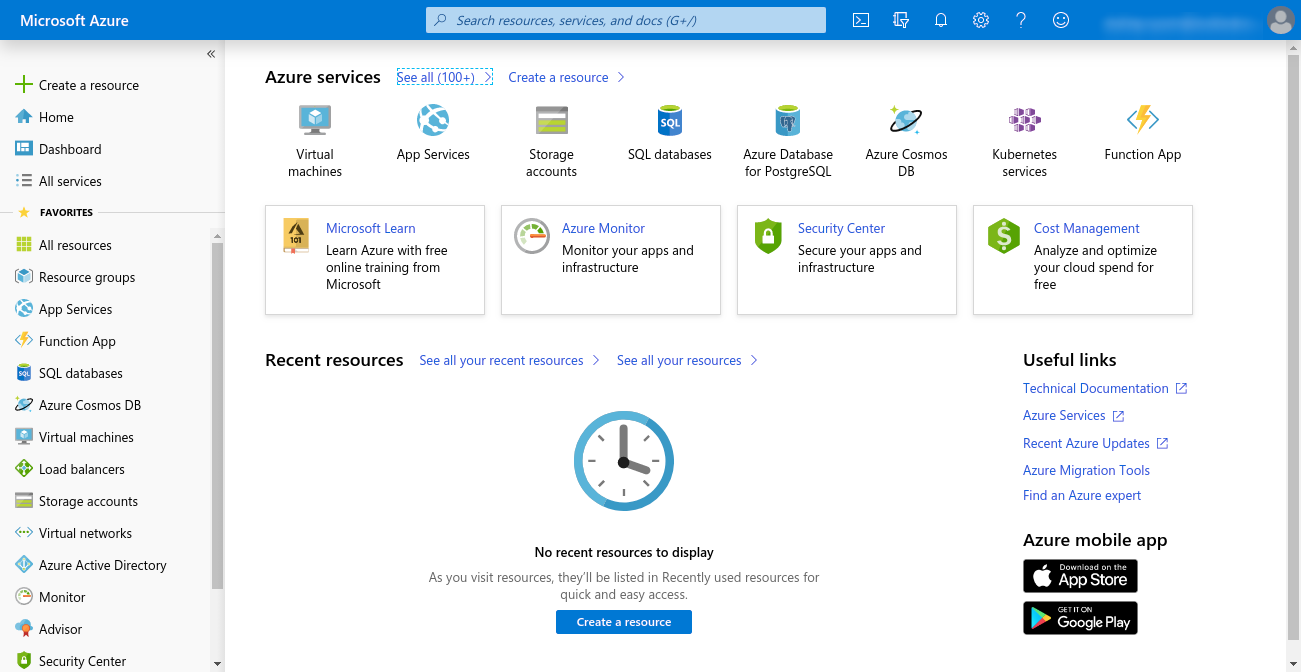
 Visit portal.azure.com and login with your Microsoft account
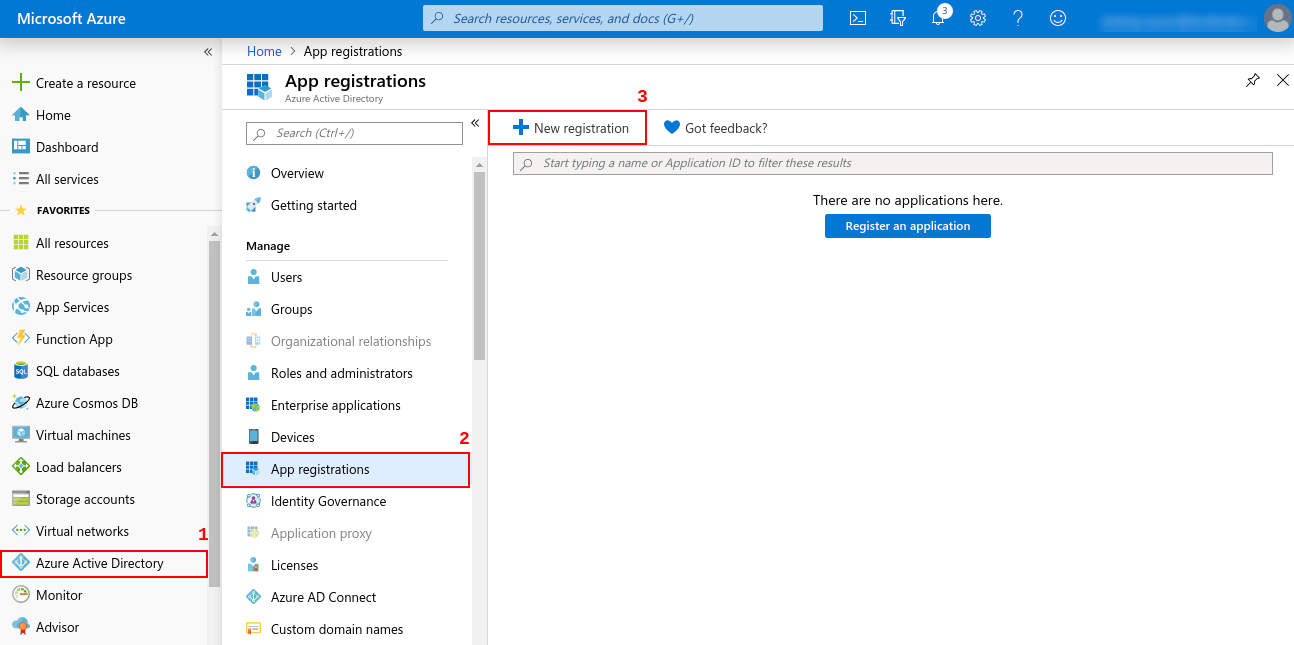
 Click on Azure Active Directory > App registrations > New Registration
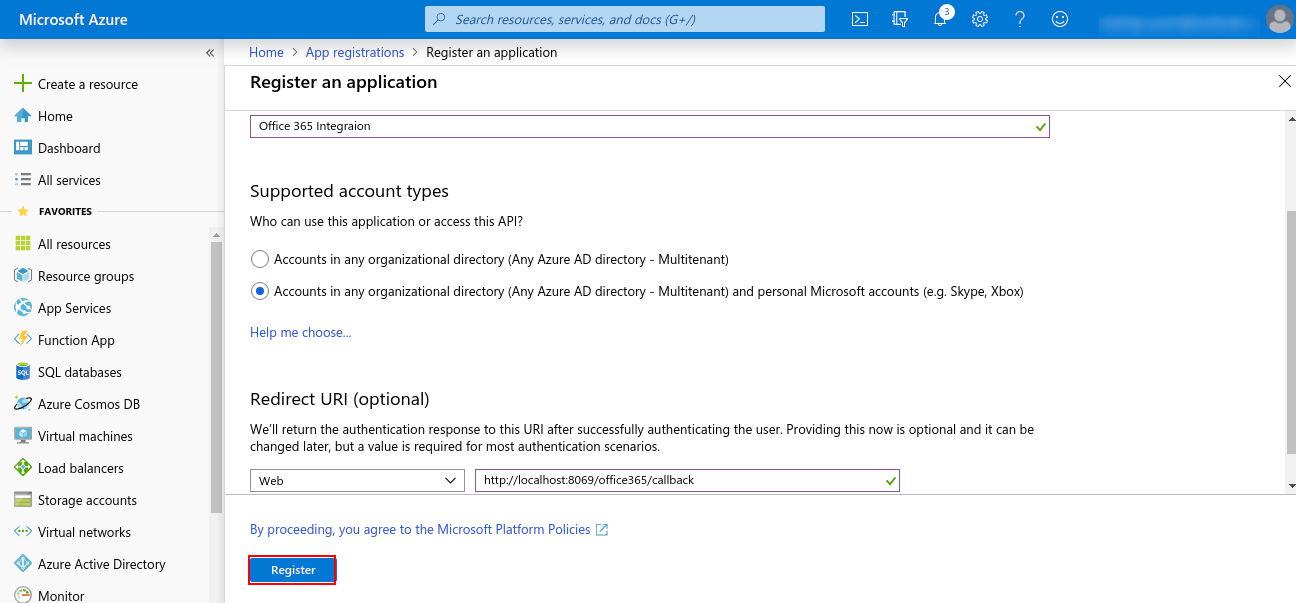
 Now, you will be asked to enter name, redirect uri for you App.
Redirect uri must be http://your-base-url/office365/callback ( this will be used for authentication ) and now click Register
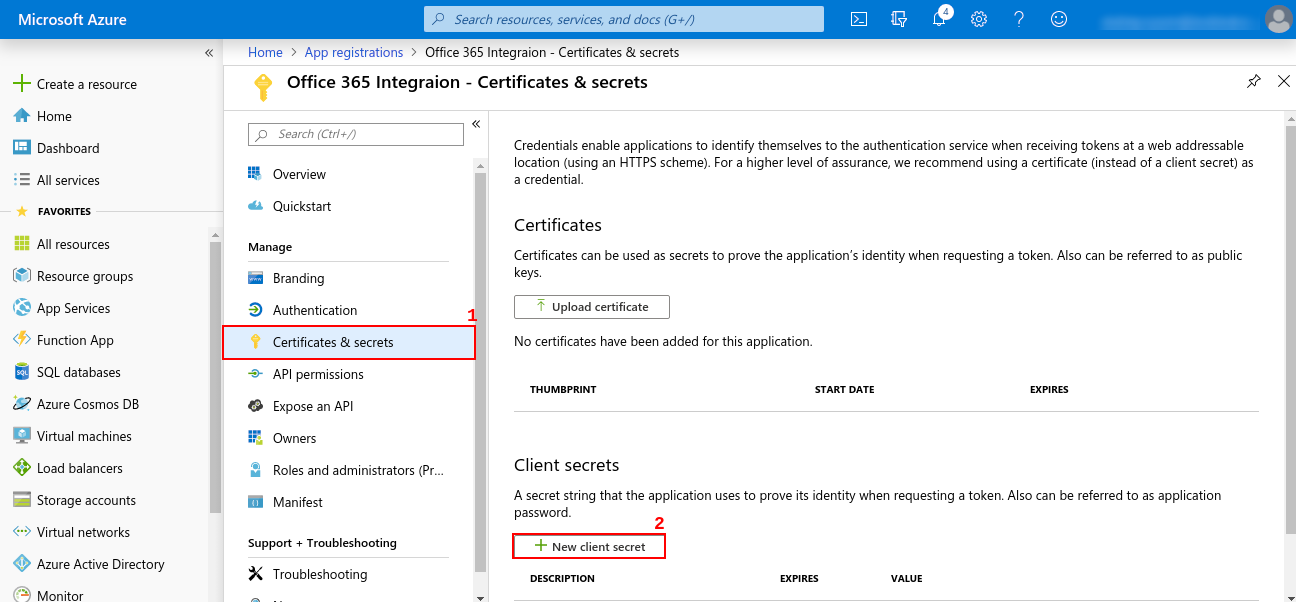
 Now, Go to Certificate & secret and create a new client secret. Copy the value of the Client Secret ( this will be used for authentication ).
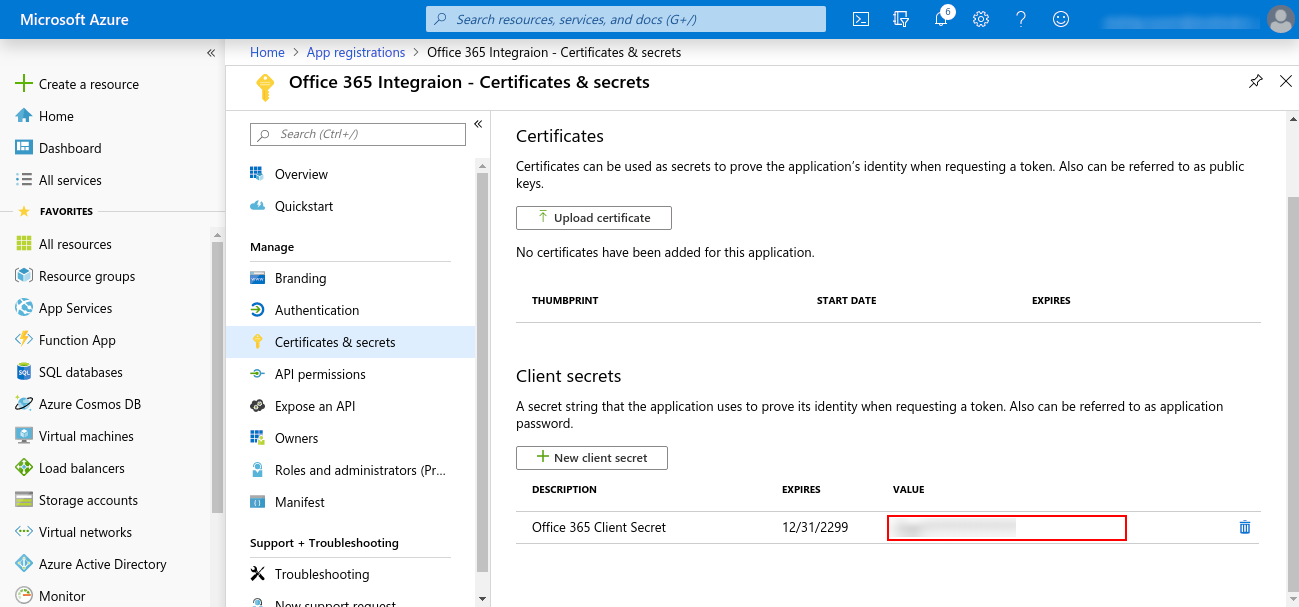
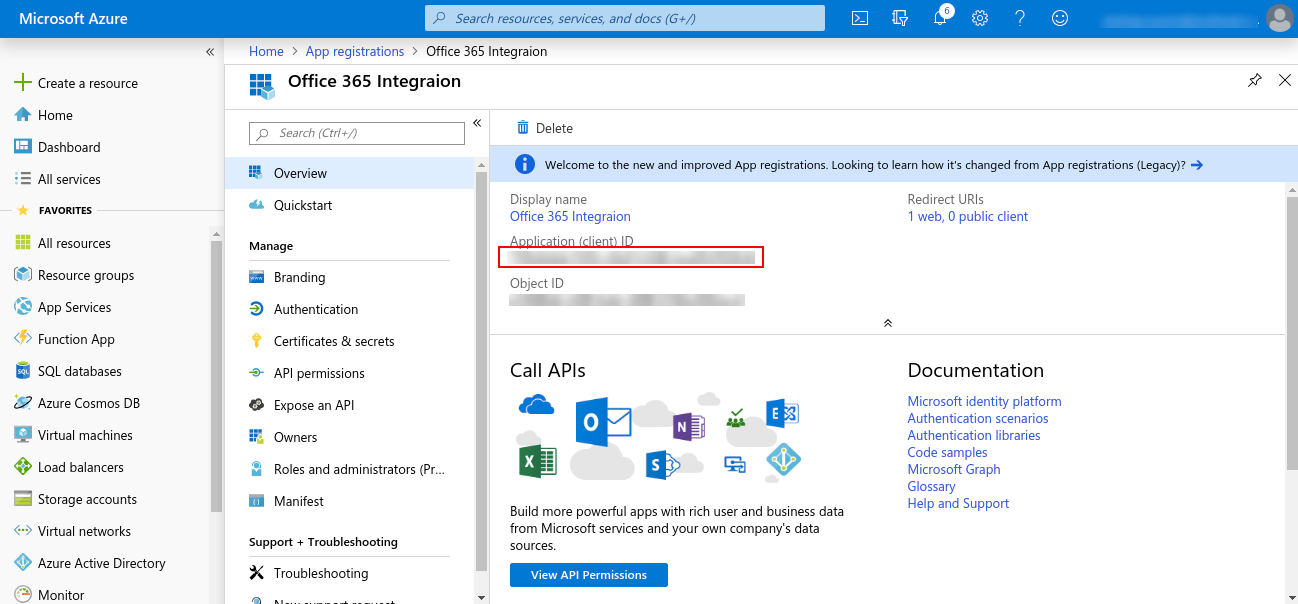
 Go to Overview and copy value of Application ID ( this will be used for authentication ).
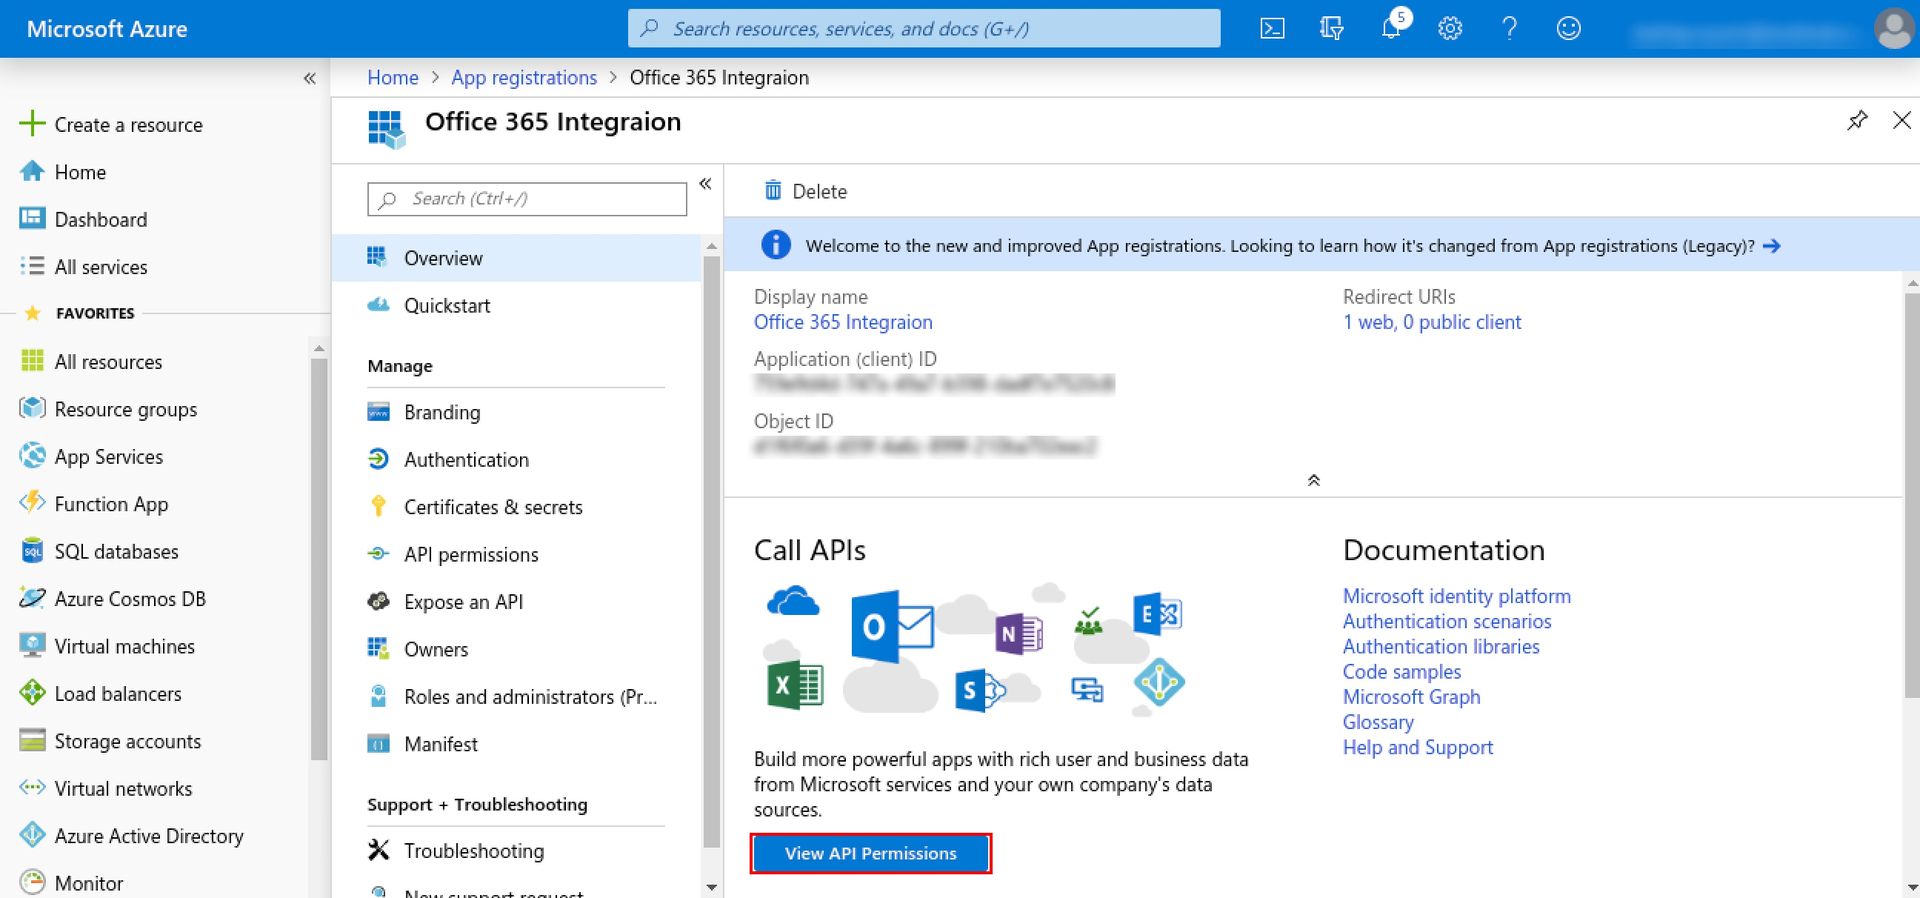
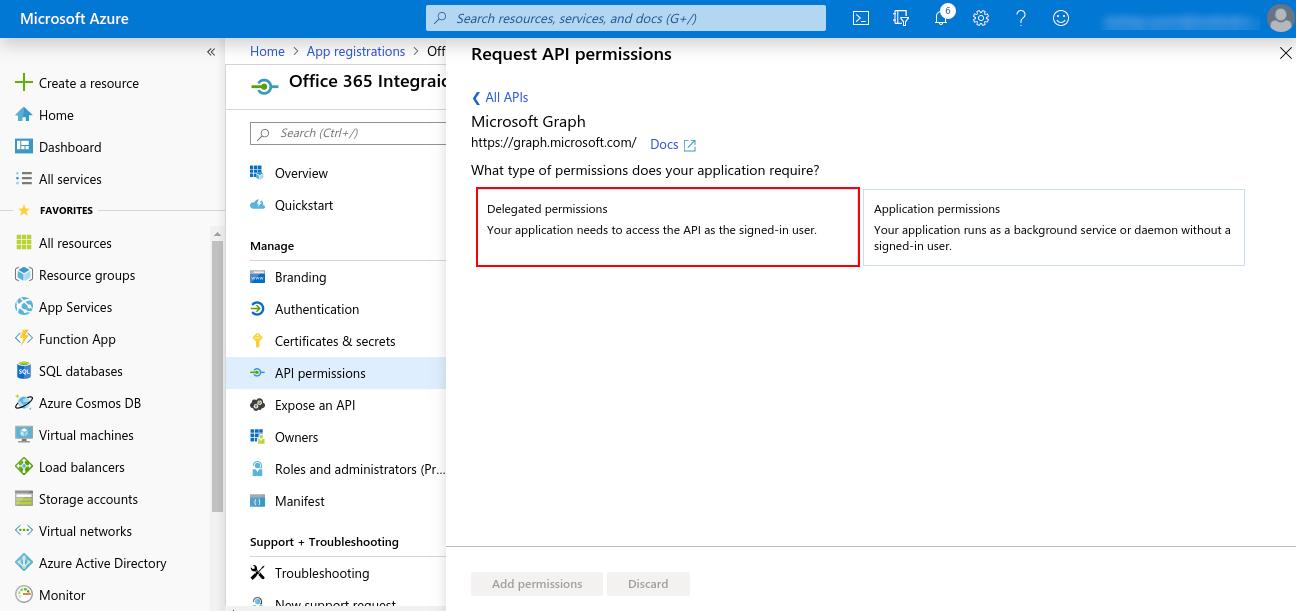
 Click on View API Permissions > Microsoft Graph > Delegated Permissions and choose required permissions and then click on Add permissions at the bottom, as shown below
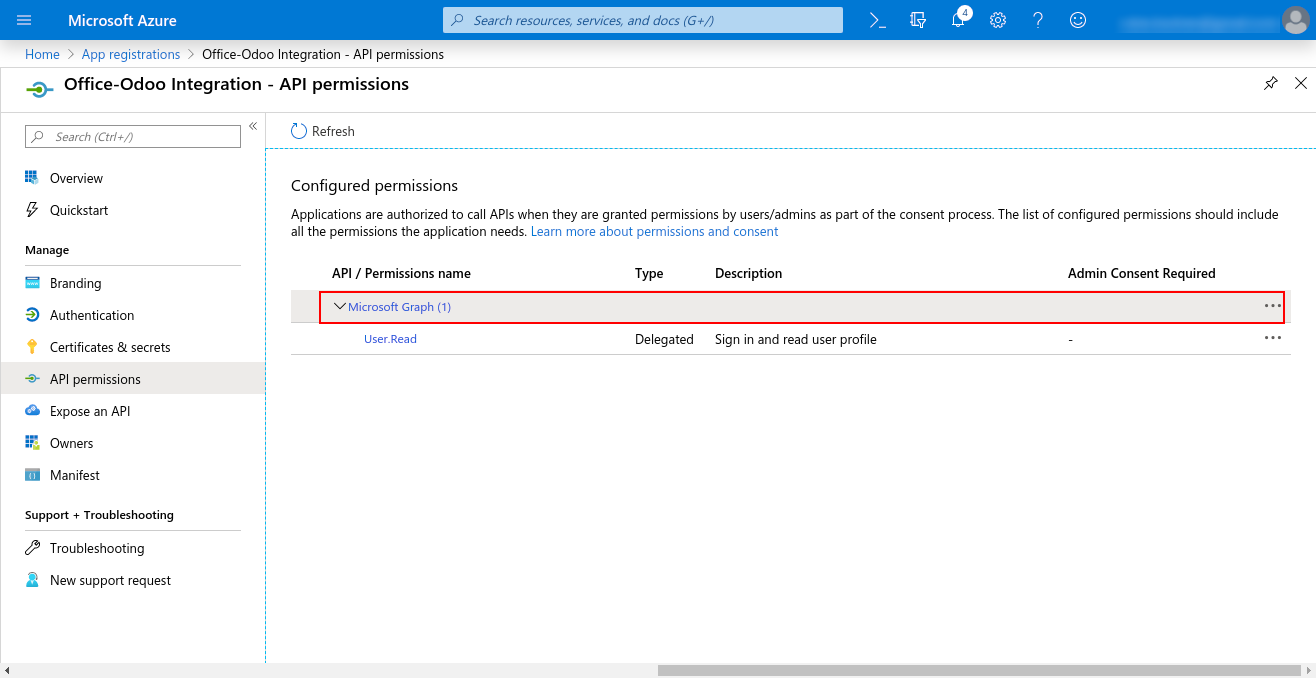
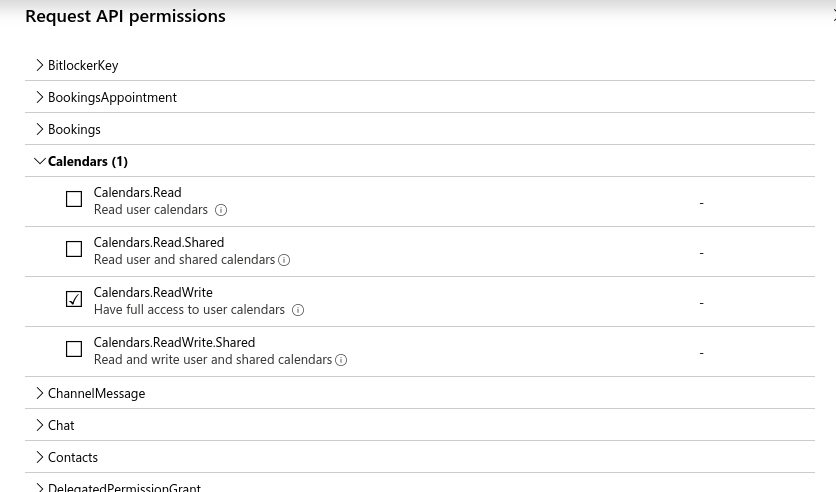
Provide ReadWrite permission for Calendar
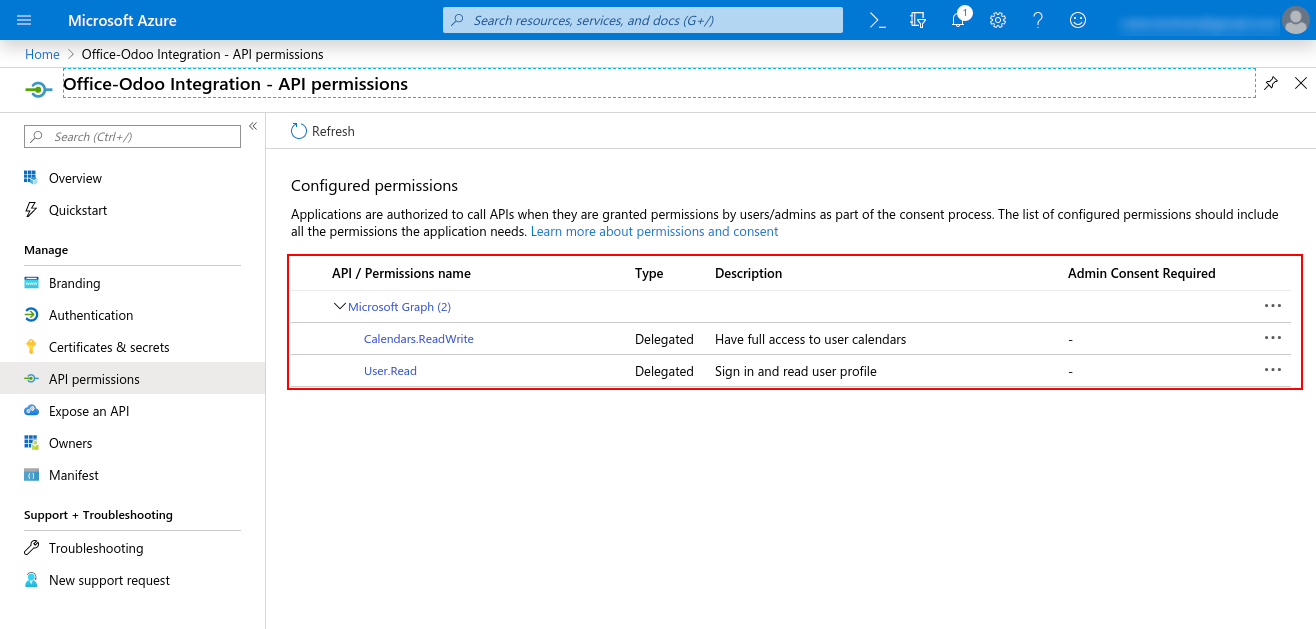
This is how the permissions will look like:
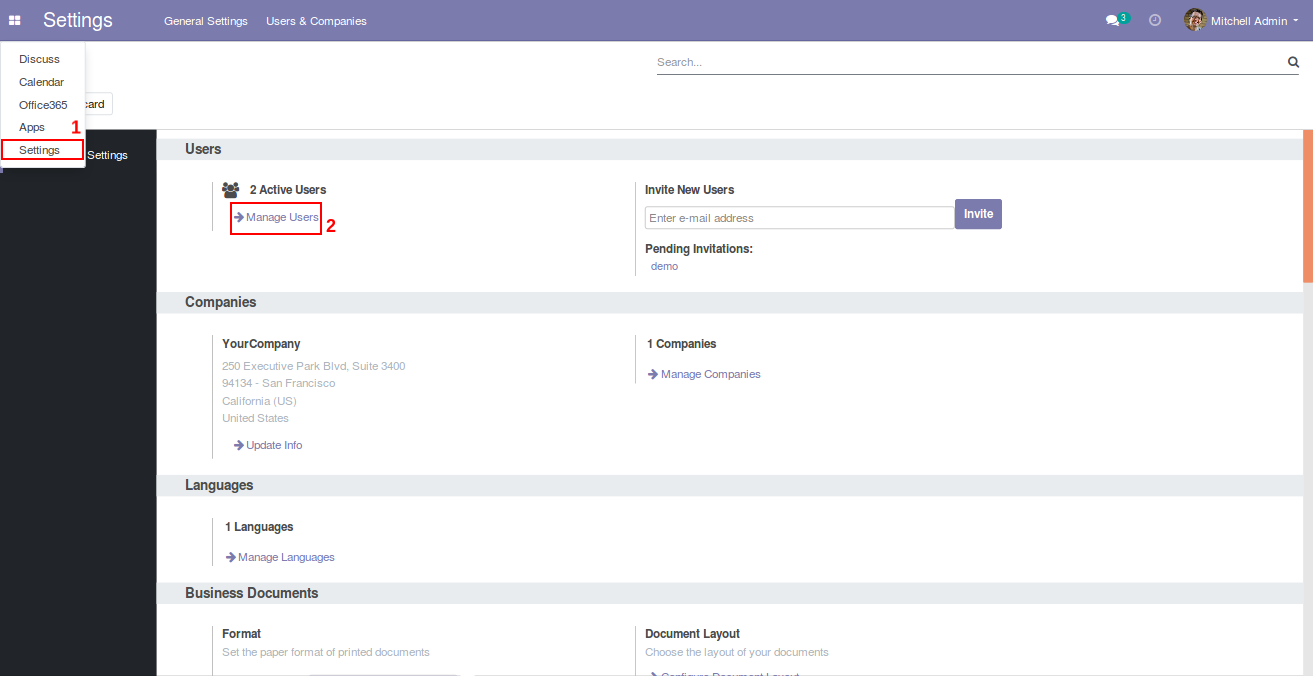
 Once you installed the Office 365 Calendar module, now go to Settings > Users & Companies > your-admin-account. In Access Rights set ‘Office365 Rights’ to ‘Office365 Manager’ and refresh the page. (Only manager has the right to authenticate the connector, other users will just sync their record)

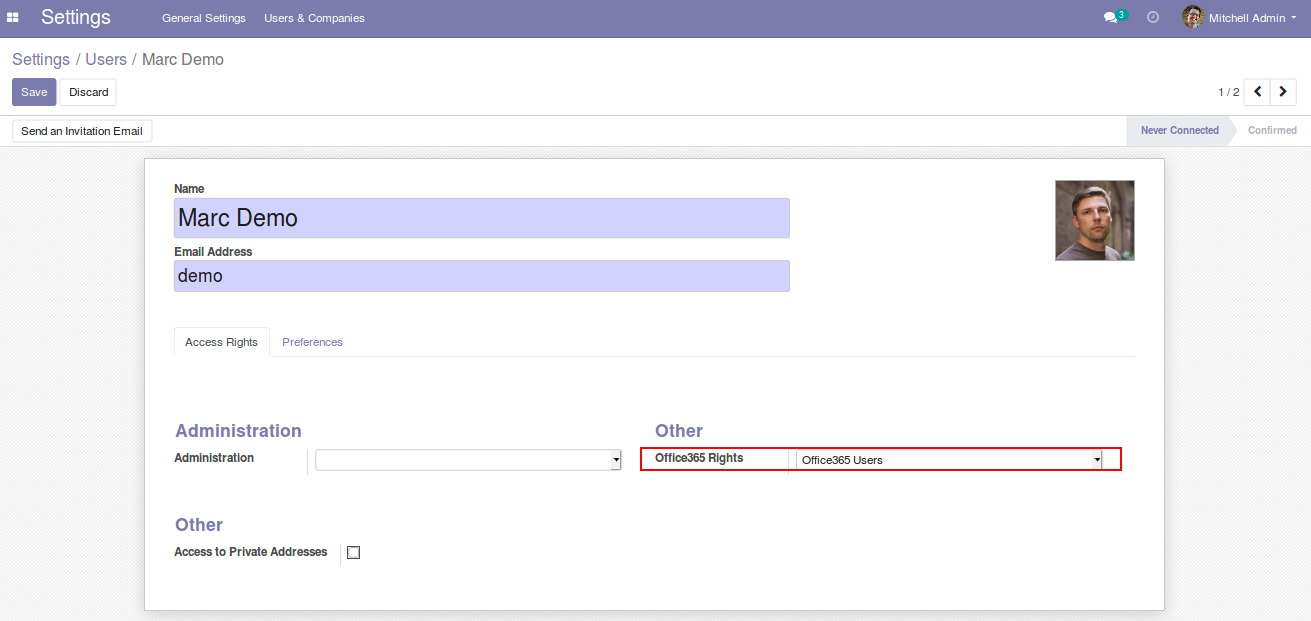
Access Rights must be given according to the User access. Manager level access can access Office 365 settings and authentication.
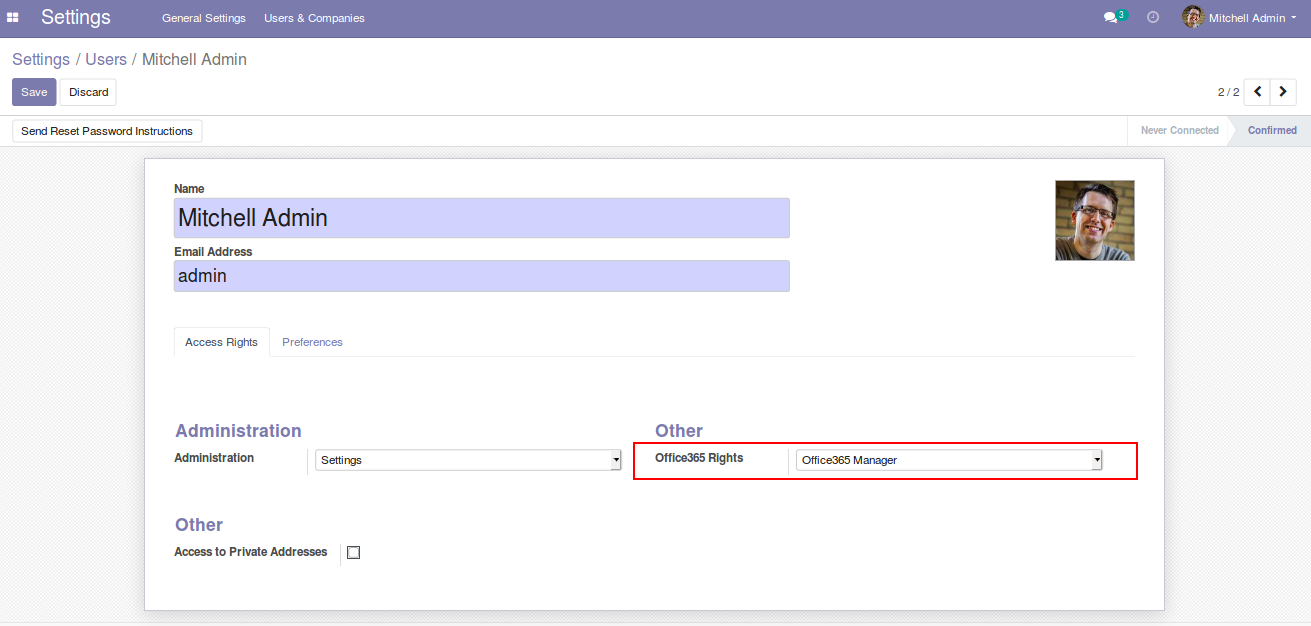
User with office365 User can only allowed for syncing.
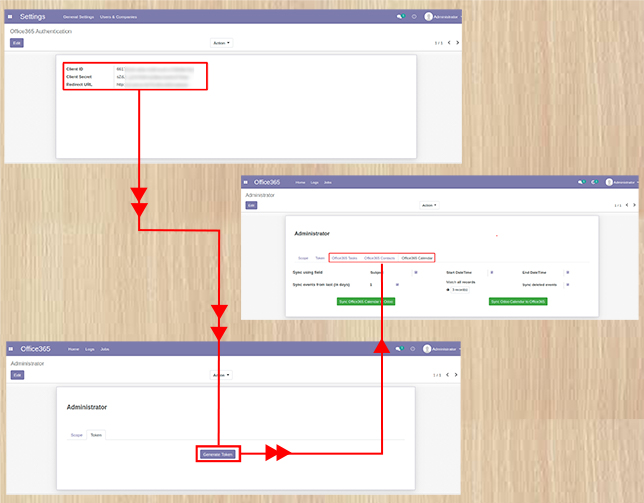
 Go to Users & Companies > Office365 Settings and set Client ID, Client Secret and Redirect URL ( all these are already generated from the azure portal just paste them here ) and click save.
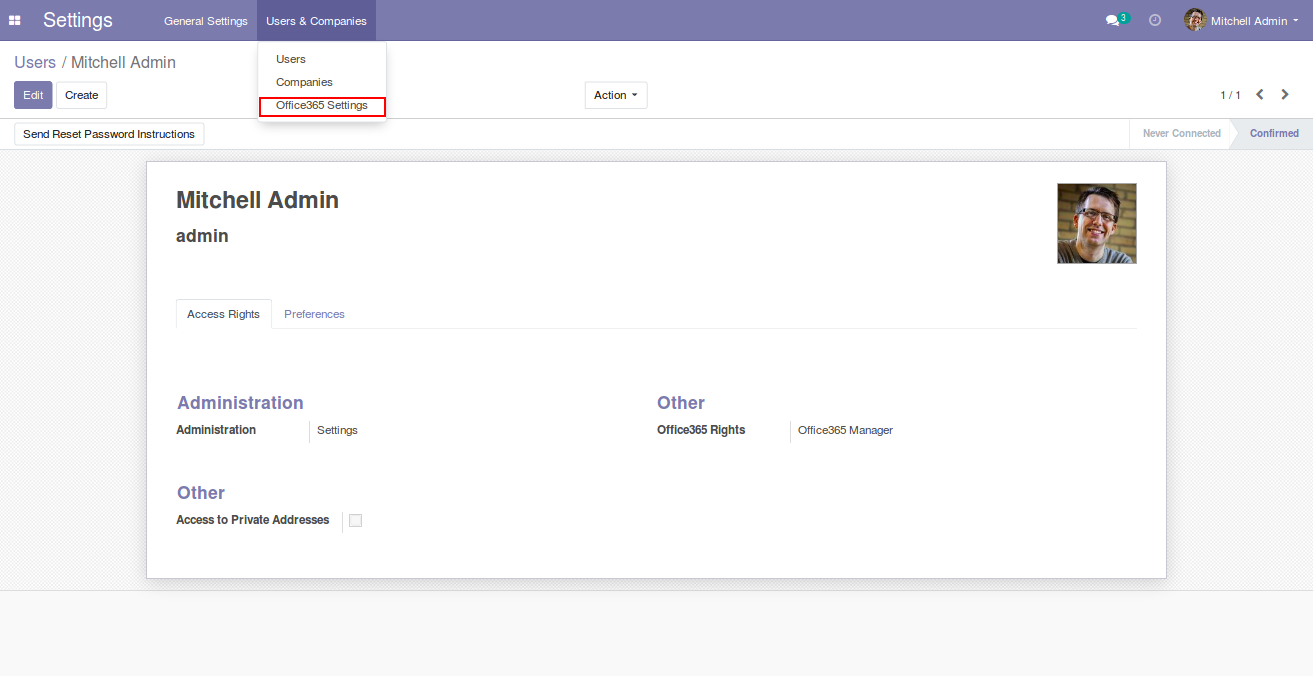
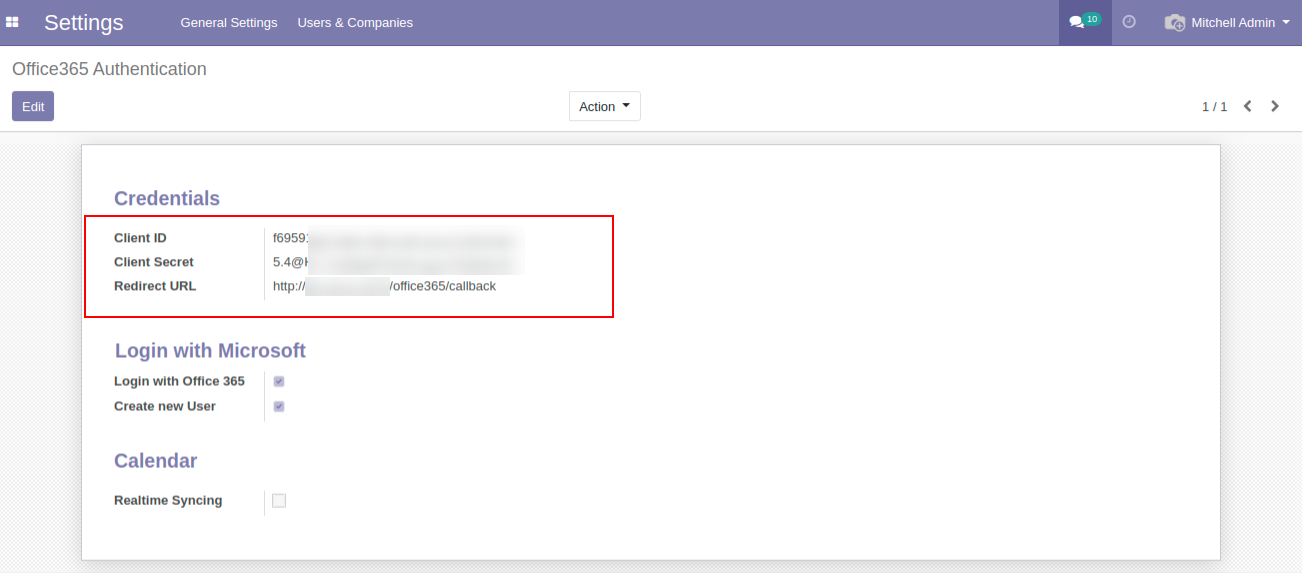
 Manager level access(Odoo Admin) can access the office 365 utilities from settings as well as from the side menu.
 Click on the Generate Token button as shown below -
Users will be asked to give permission to read and write to Microsoft Calendar. Click on the Yes button in order to proceed further.
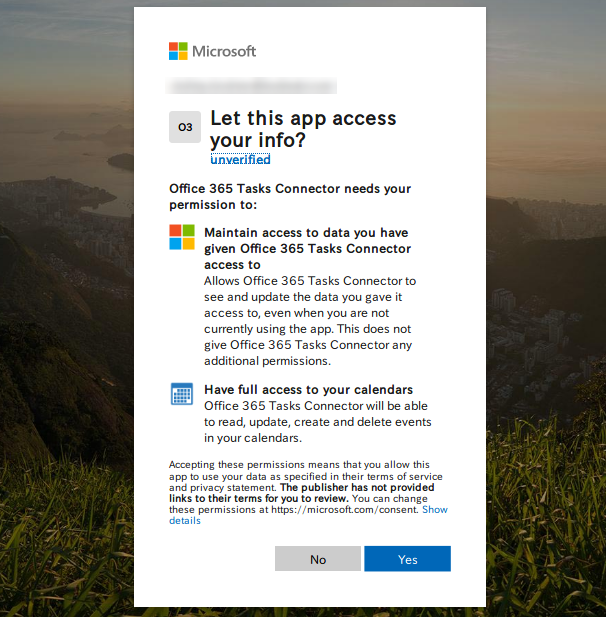
Click on the office365 menu > Logs menu , It will display as Token generated successfully.

Office 365 Calendar Features and Working
 Click on the Office 365 menu.
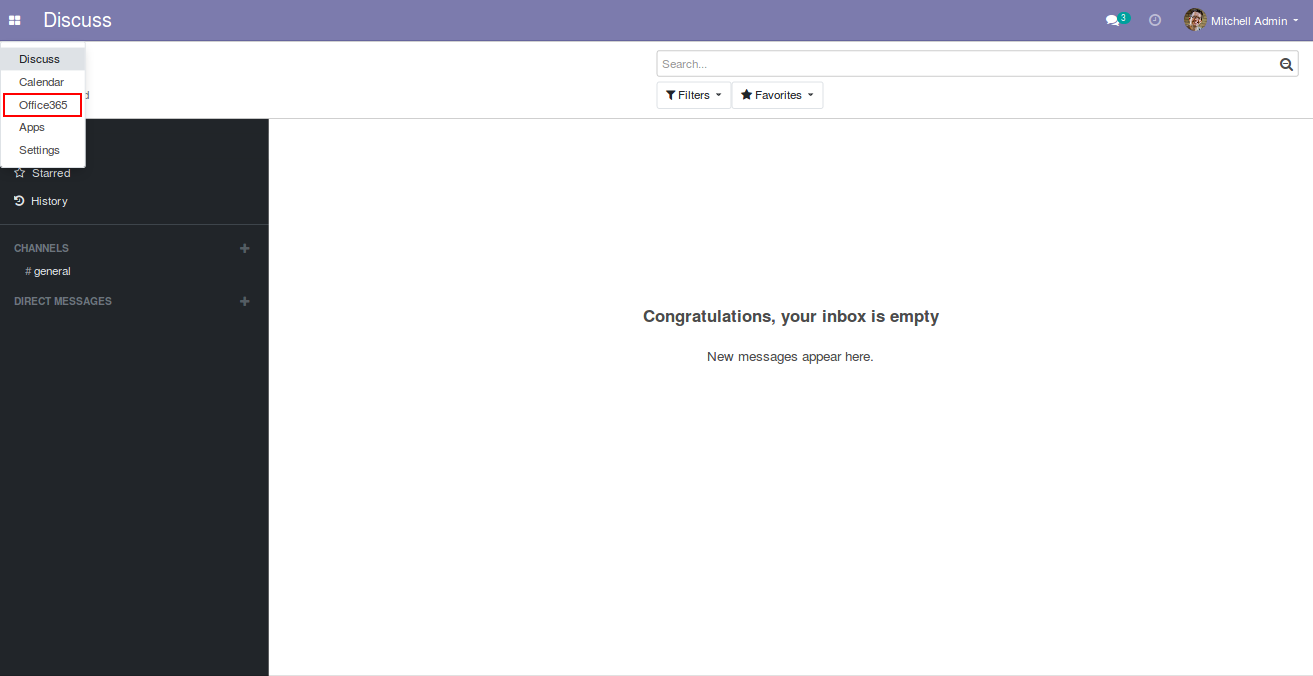
 Click on Office365 Calendar tab.
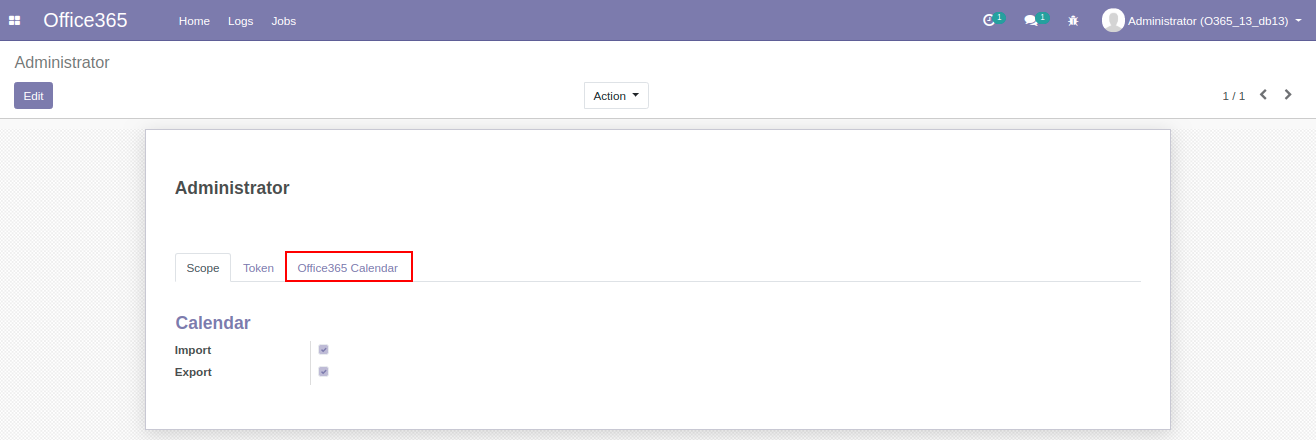
 You will have multiple filters to sync the events, there will be two options to
sync events on both sides. Firstly you have to choose the key fields to sync,
it is highly recommended to choose those fields that uniquely identify each event.
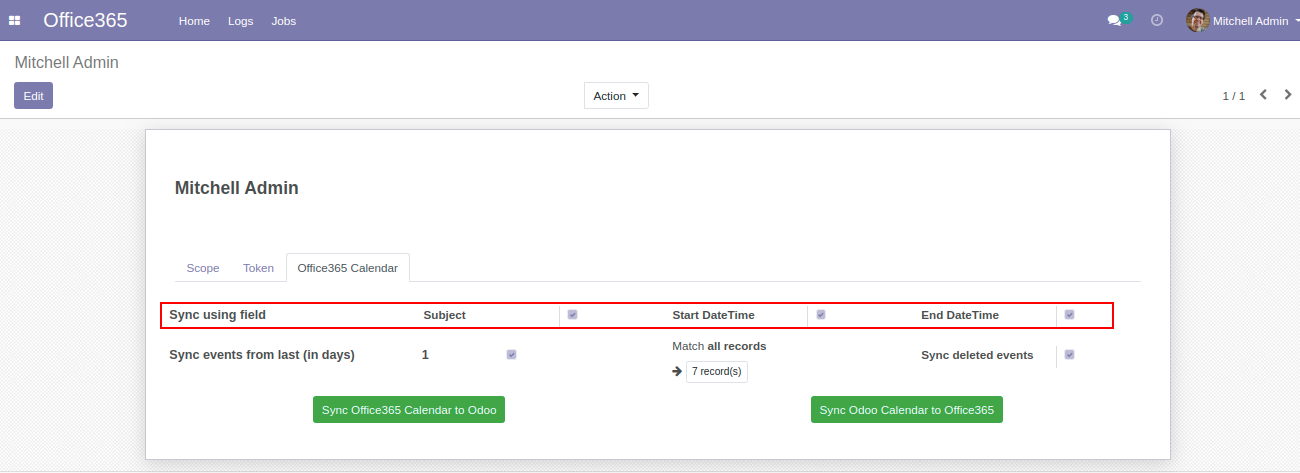
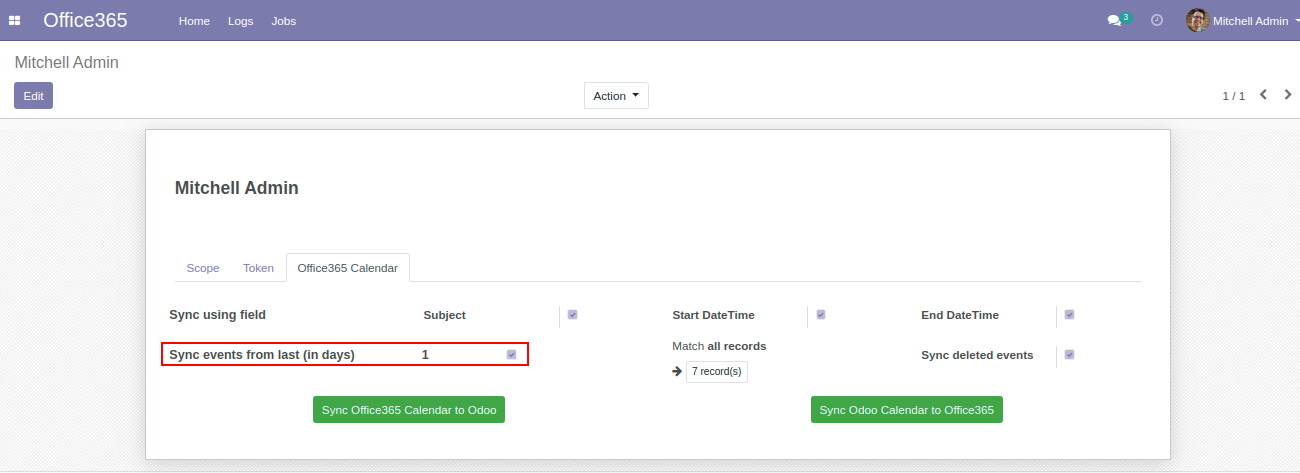
If you wish to sync only latest events, then you need to input the days in order to sync those events.
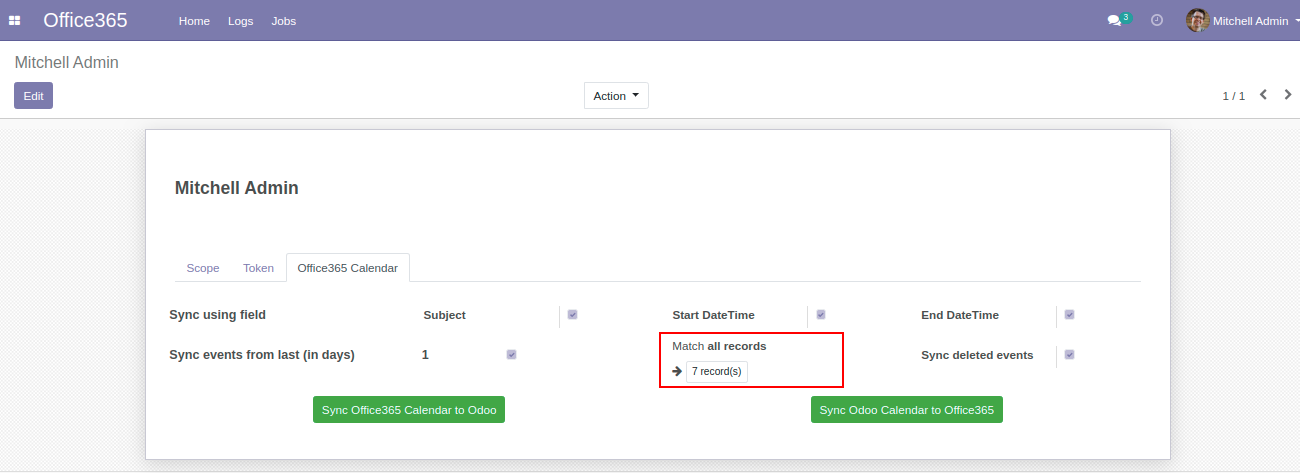
 Further, if you wish to filter your events then you can choose a domain filter
to view your results. This is only applicable from Odoo to Office 365.
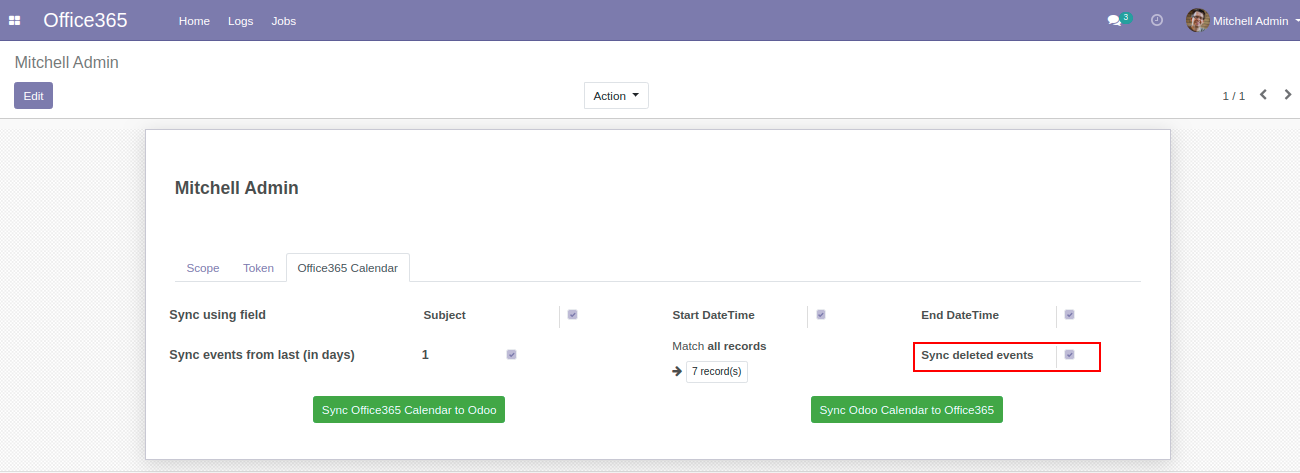
You have an option to sync deleted events from Odoo and Outlook Calendar, this will deleted any event from Odoo Calendar if its deleted in Outlook Calendar and vice-versa.
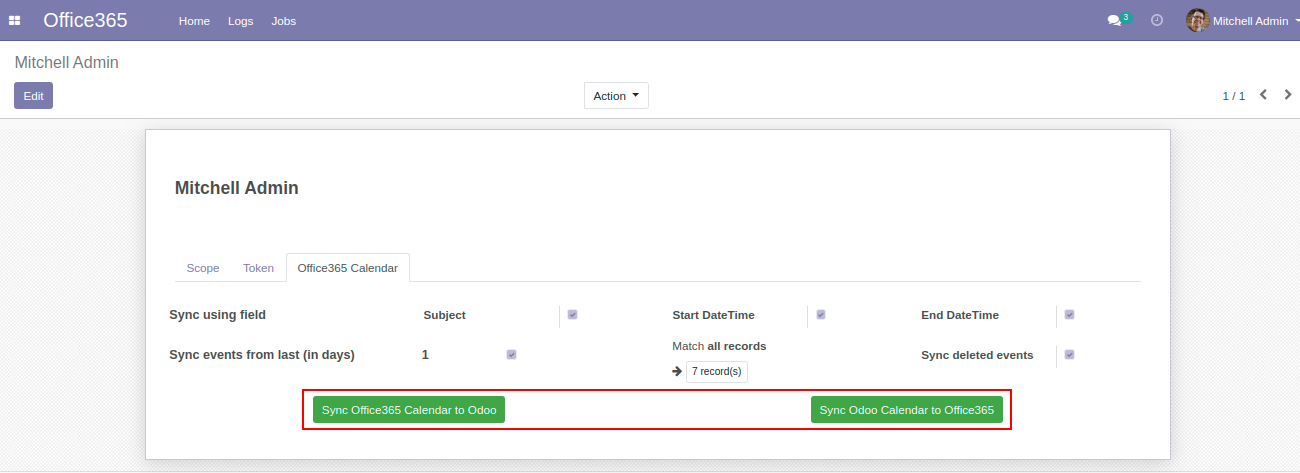
Next you can choose appropriate syncing direction.
Syncing Odoo - Outlook Calendar Events
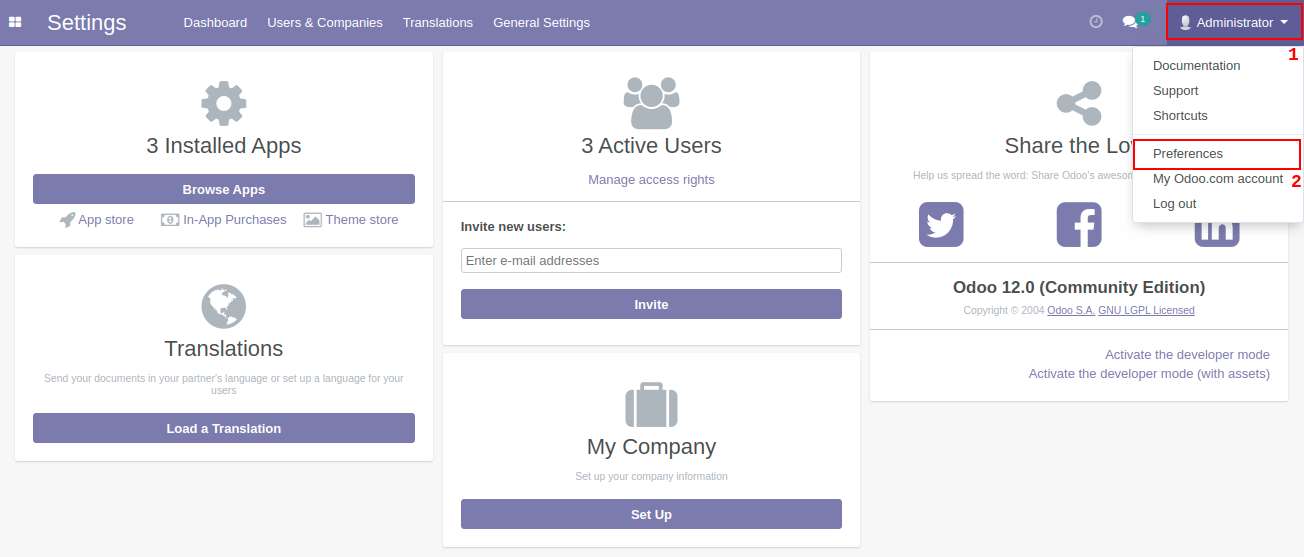
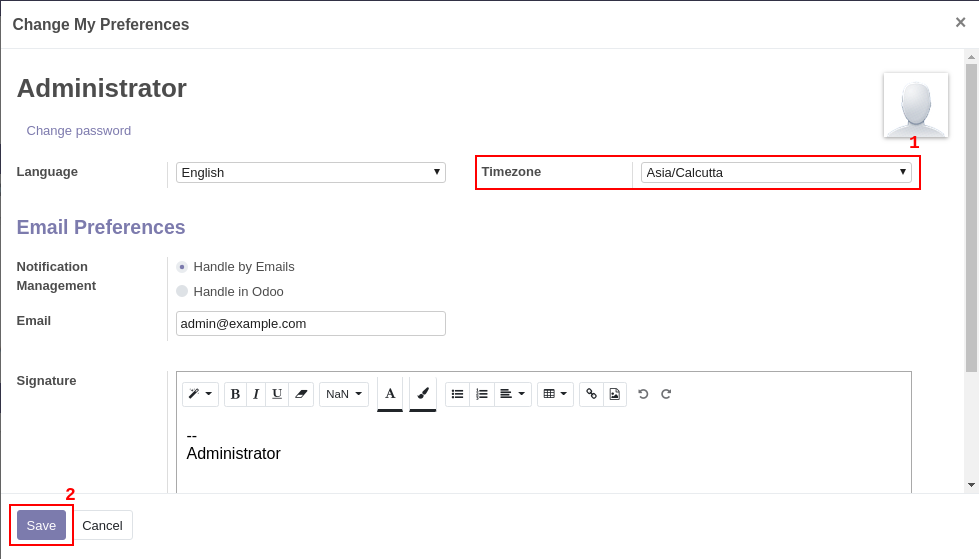
 You must set your timezone in order to match the timings of calendar events.
You can do so by clicking on your Profile > Preference. Then you can set your
timezone and then click on the Save button.
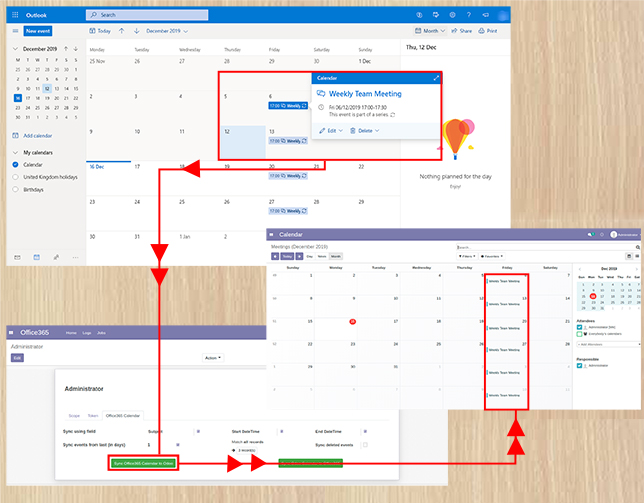
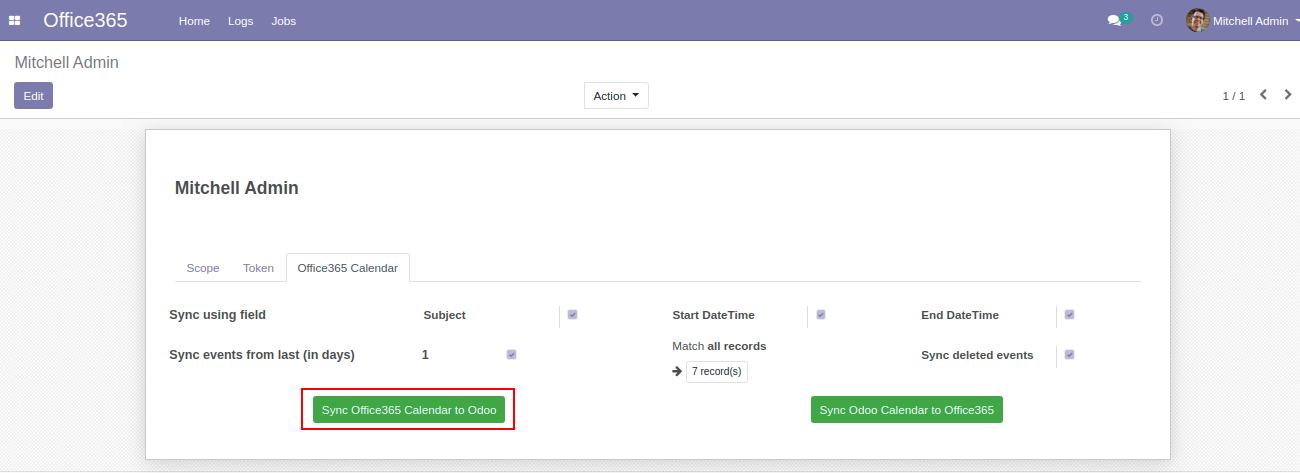
 If you click on Sync Office365 Calendar to Odoo, your outlook events will be synced with odoo events.
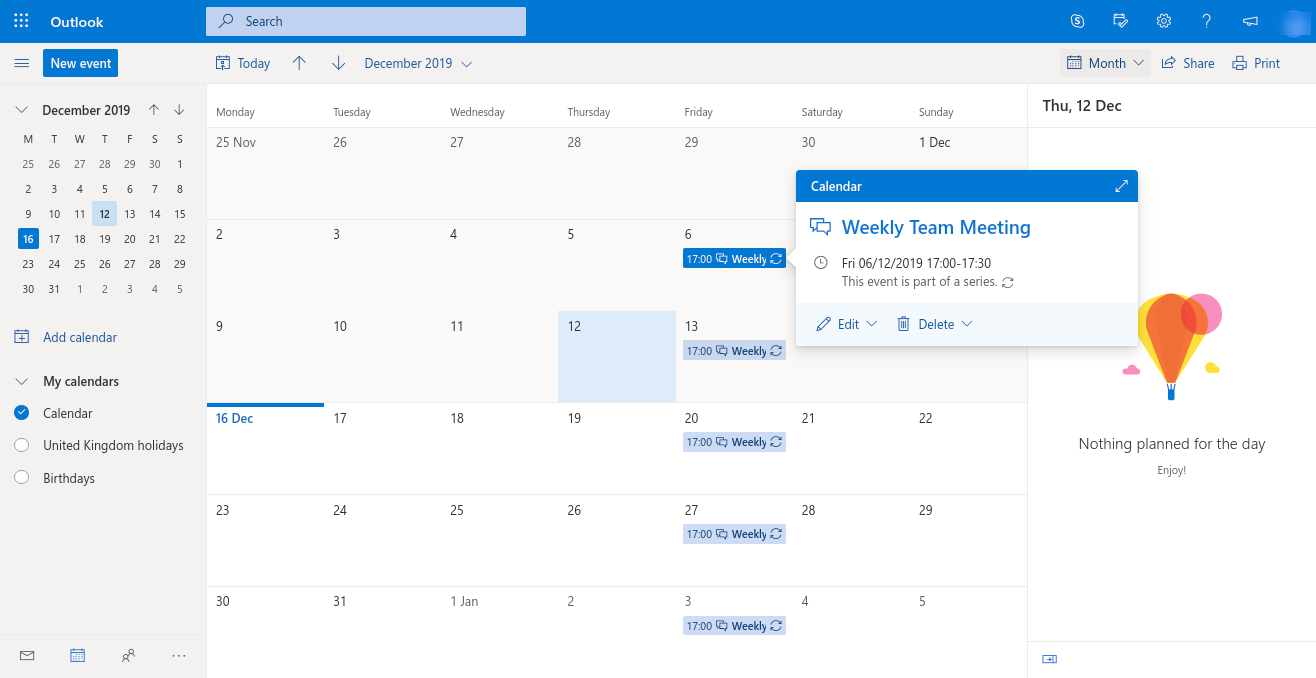
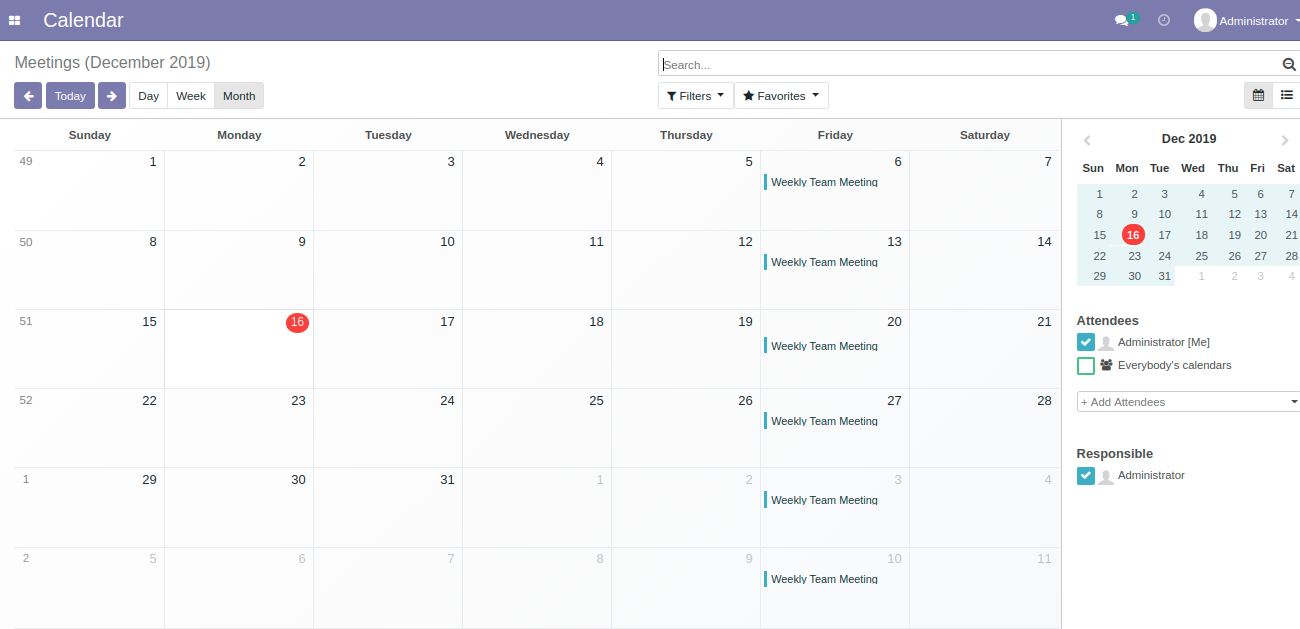
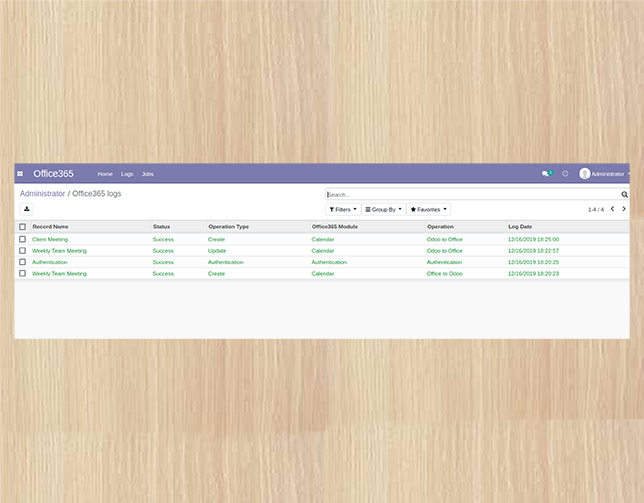
You will be redirected to the logs with details of all the events that are synced.

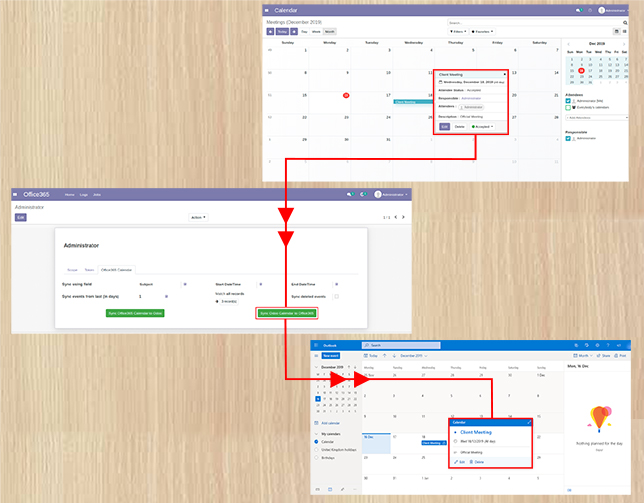
 If you click on Sync Odoo Calendar to Office365, your odoo events will be synced with outlook events.
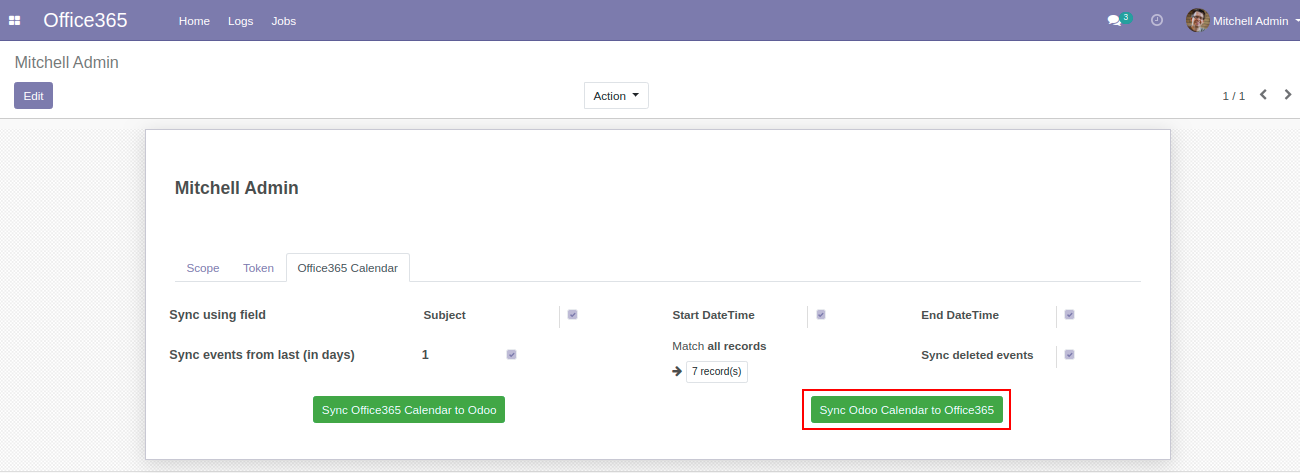
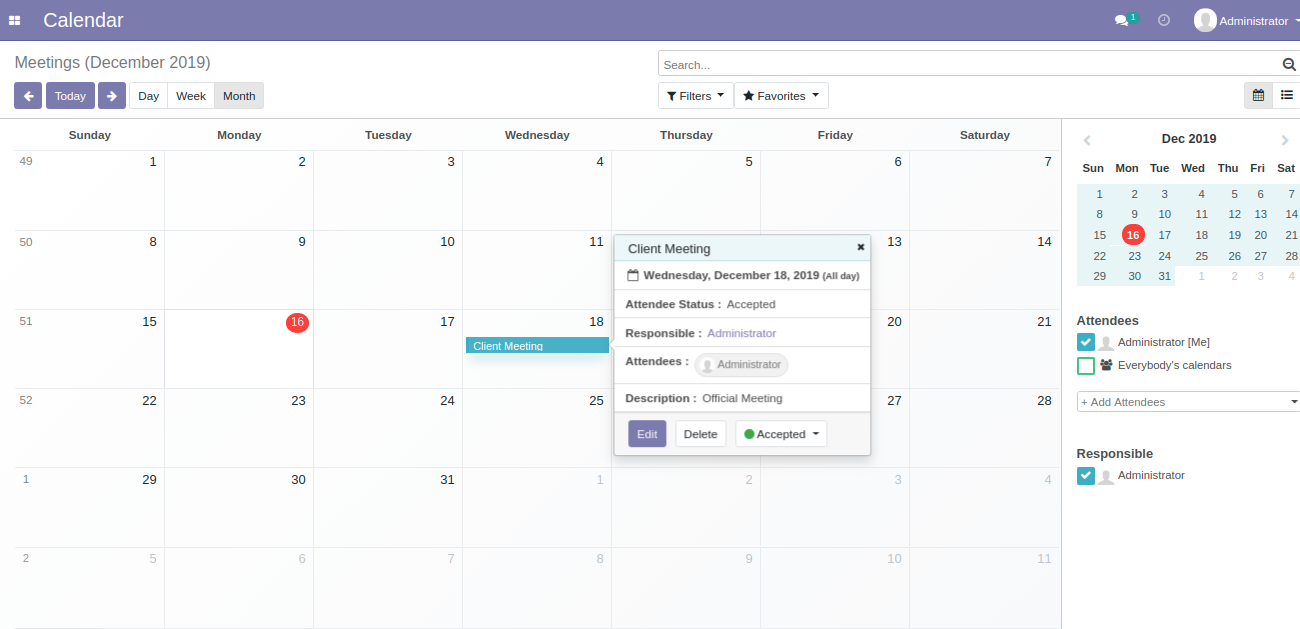
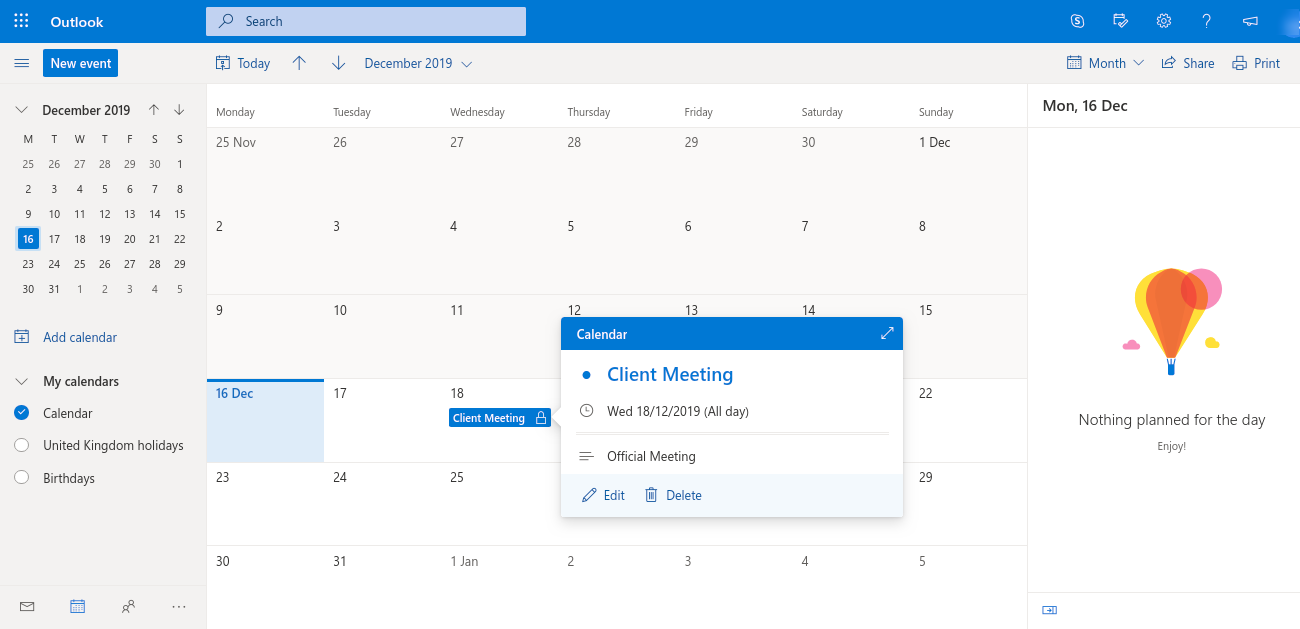
You will be redirected to the logs with details of all the events that are synced.

Real-time Syncing
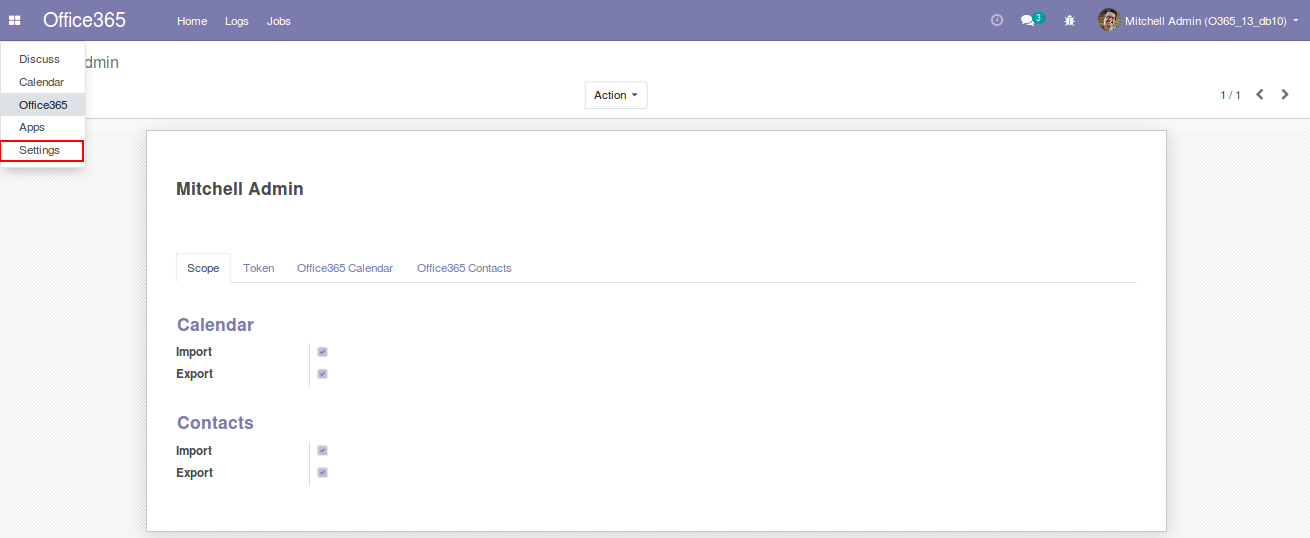
 User has an option to sync ODOO Calendar event as soon as they are created (from Odoo to Outlook), to do so you have to go
to Settings > Users & Companies > Office365 Settings
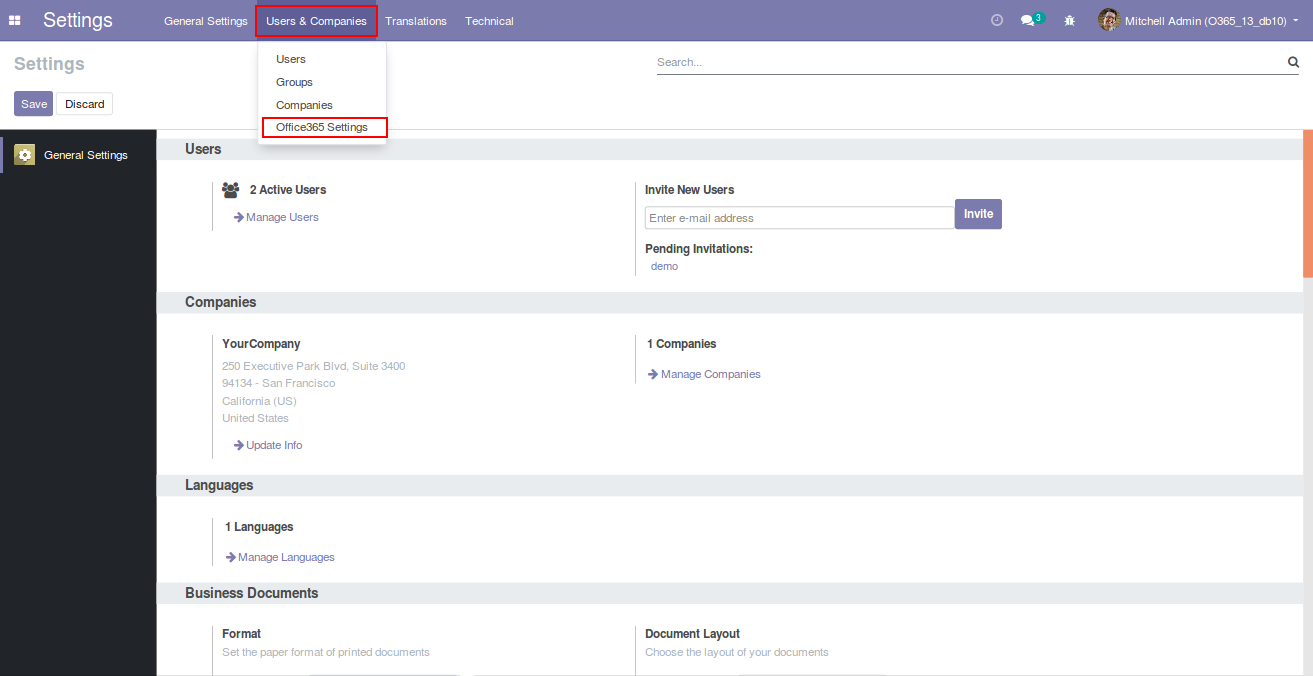
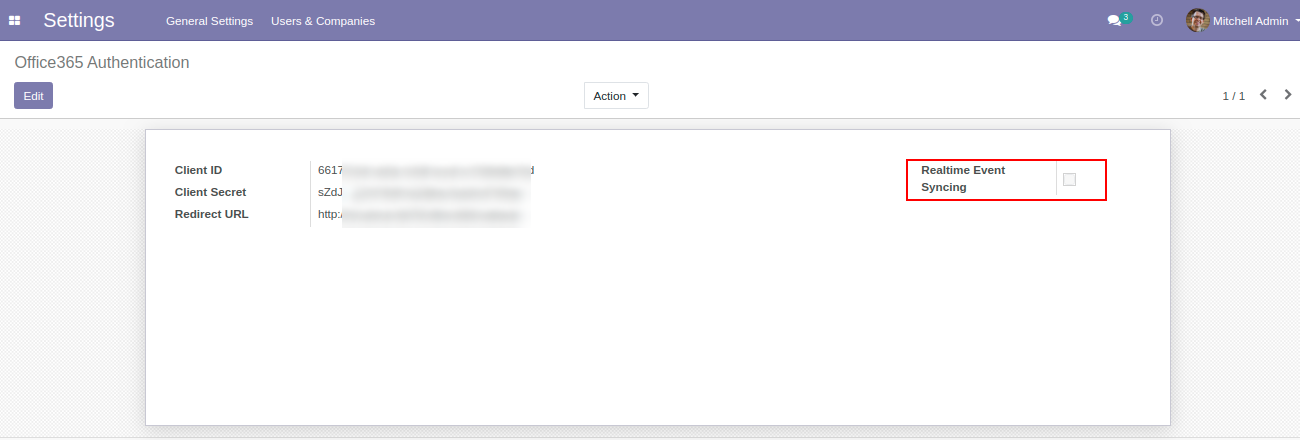
Now turn on 'Realtime Event Syncing'
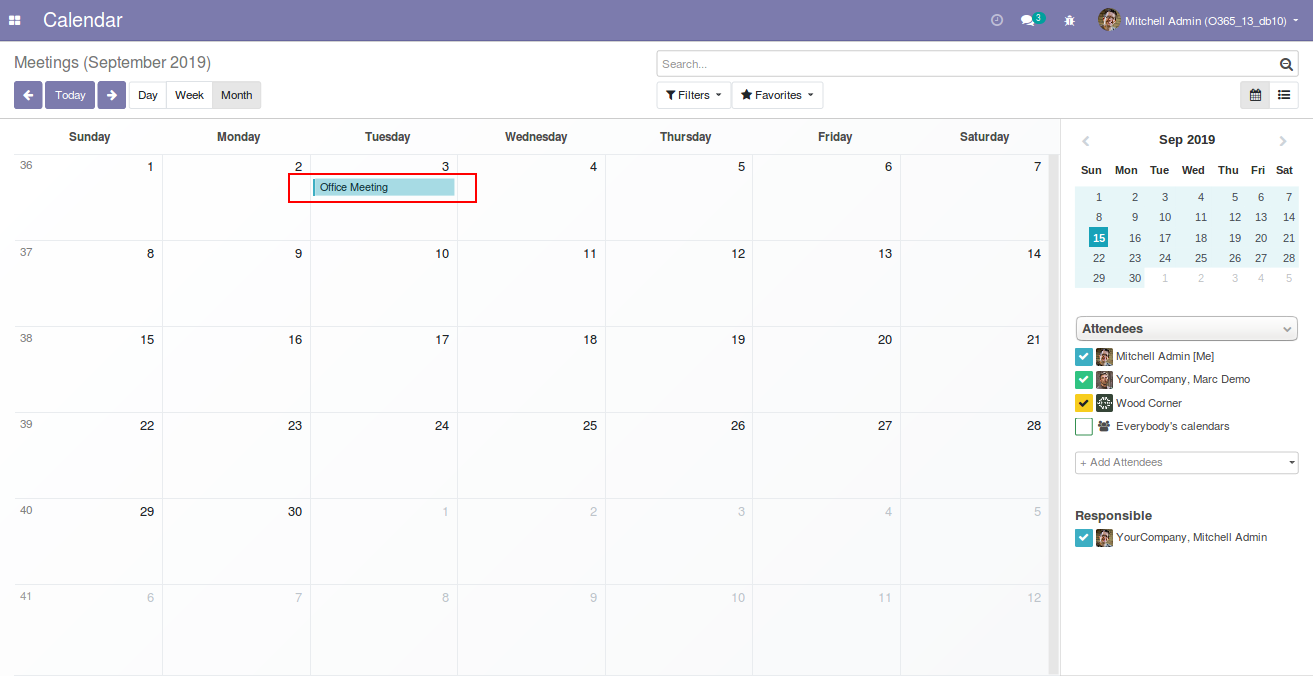
Whenever you create an Calendar event in odoo it will automatically be synced to Microsoft events
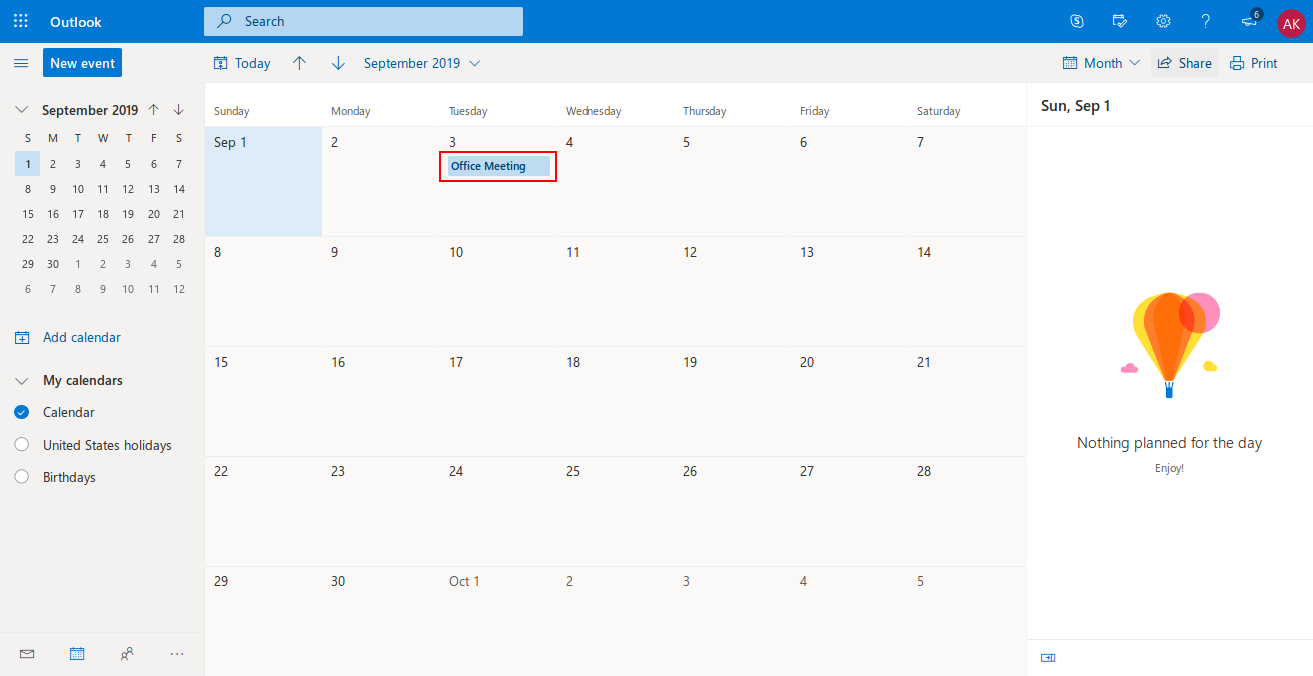
Job Processes Working
 User can keep an eye of their previously successful or unsuccessful jobs
by visiting Jobs menu on the top.
For any unsuccessful job, you can see how many records are processed and the corresponding reasons for the failures.

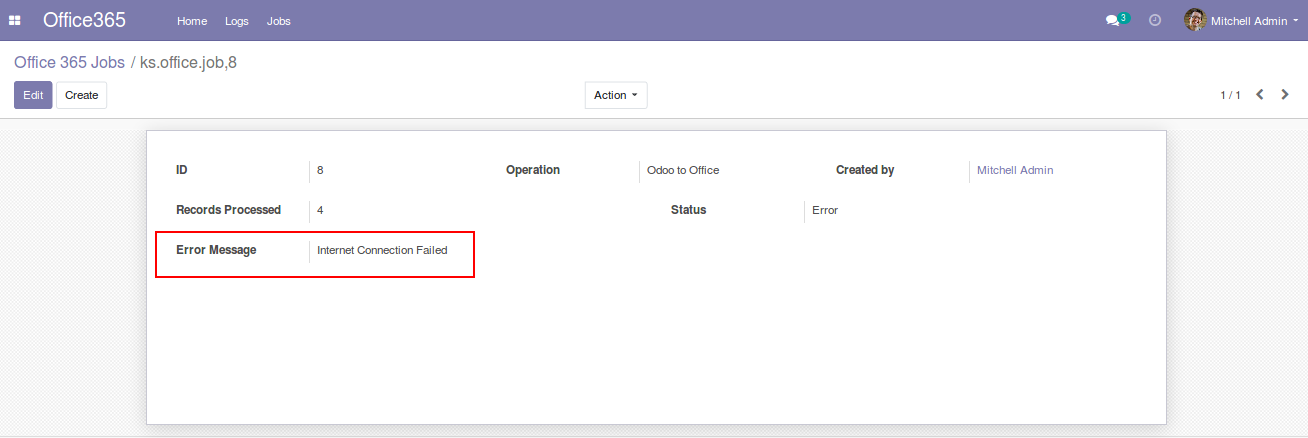
Syncing will resume from the last record processed, and if you want to sync all over again you can delete the entry and start syncing.

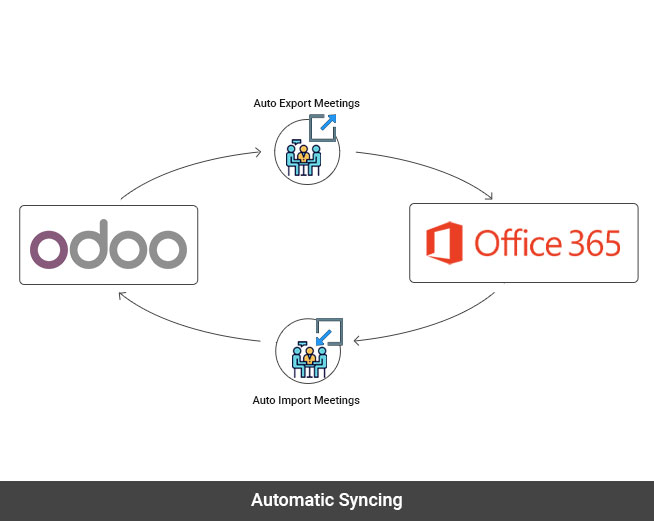
Automatic Syncing
 You can manually sync your calendar events or you can activate cron to do
syncing automatically.
 To activate cron follow the following steps -
Go to Settings, and then Activate the developer mode
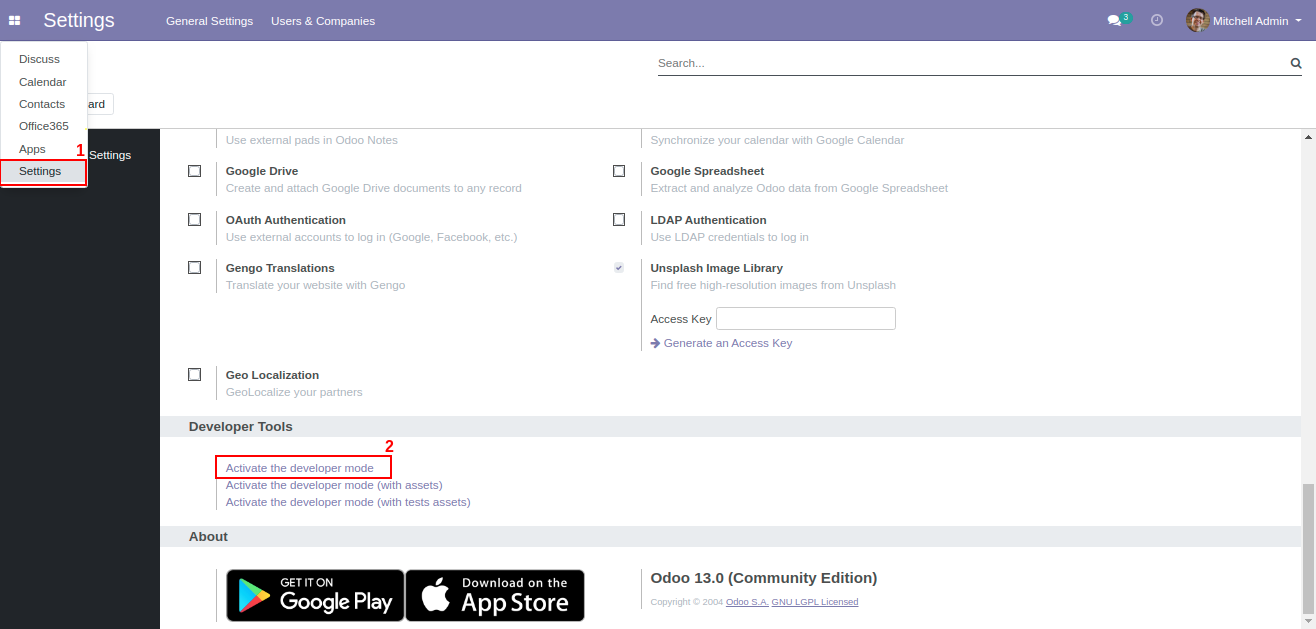
 Now go to Technical > Scheduled Actions
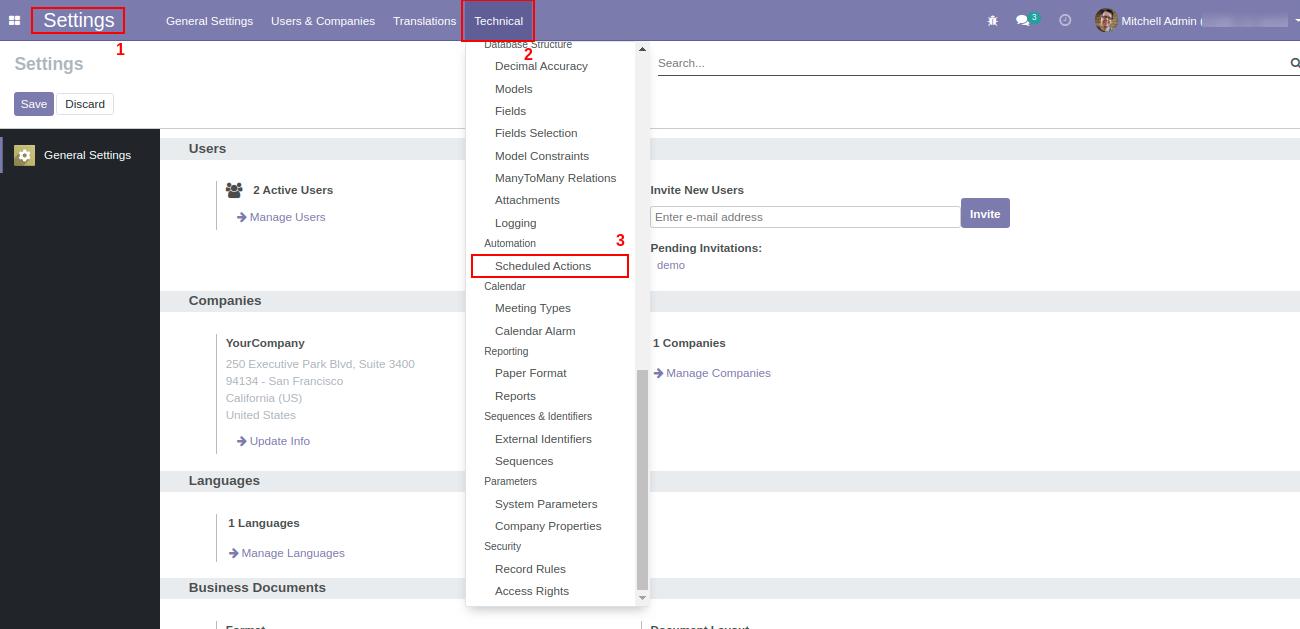
You will see two crons 'Run Office 365 Calendar Import Cron' and 'Run Office 365 Calendar Export Cron' for importing and exporting respectively.
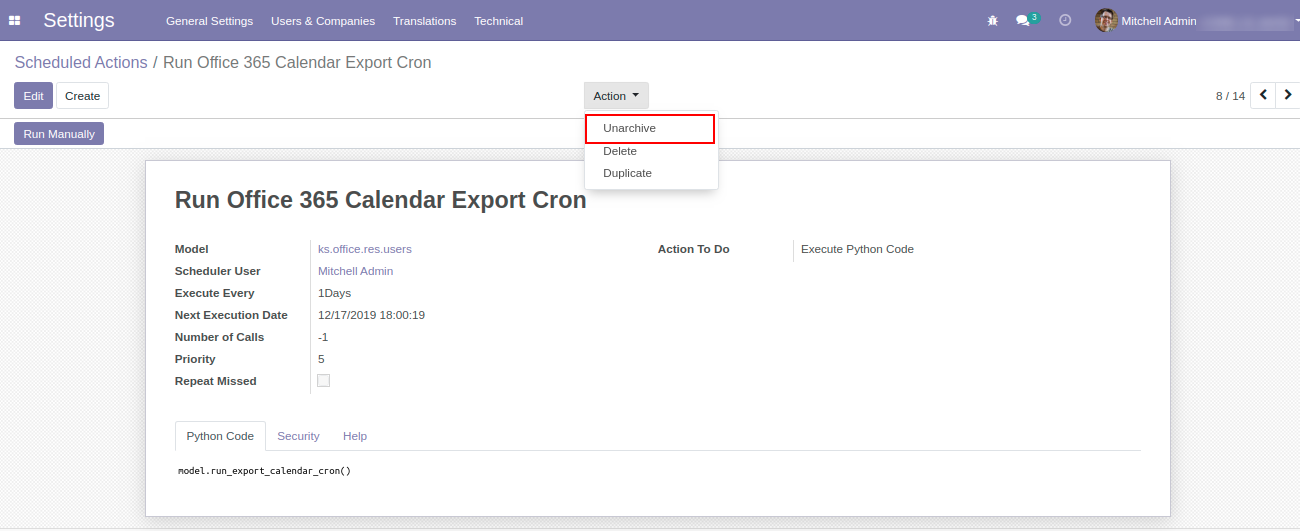
If you wish to export Odoo calendar events to Microsoft calendar automatically, click on Run Office 365 Calendar Export Cron.
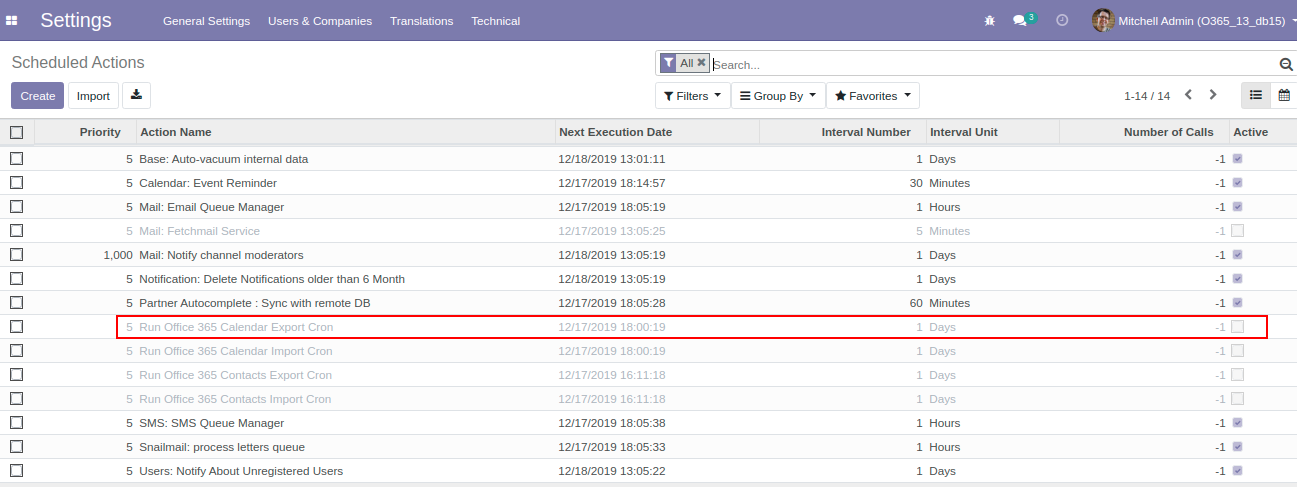
You can activate the cron by clicking the Off button, as shown below
If you wish to import Microsoft calendar events to Odoo calendar automatically, click on Run Office 365 Calender Import Cron.
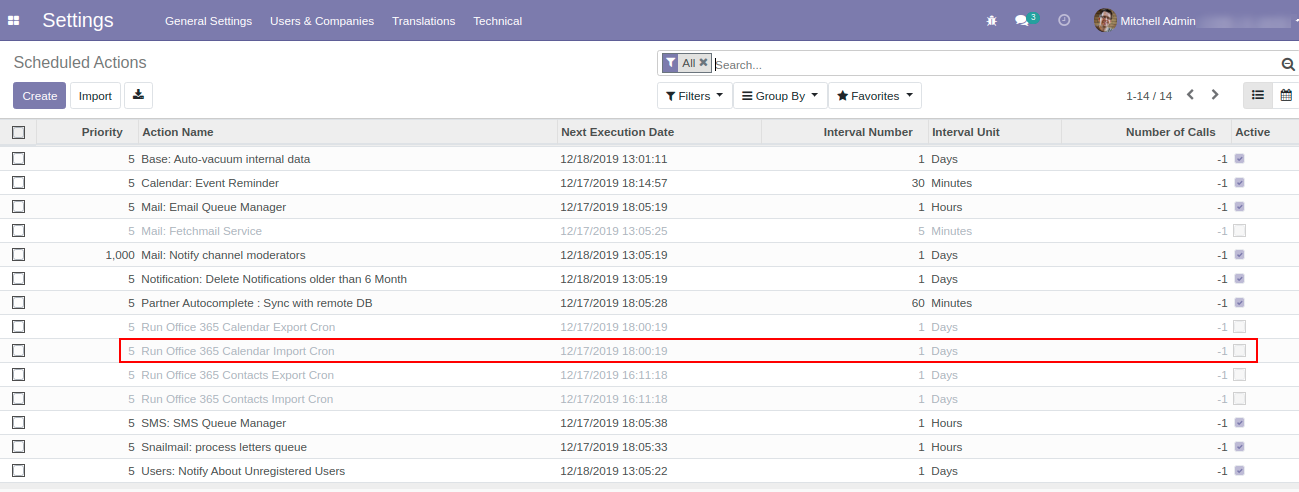
You can activate the cron by clicking the Off button, as shown below
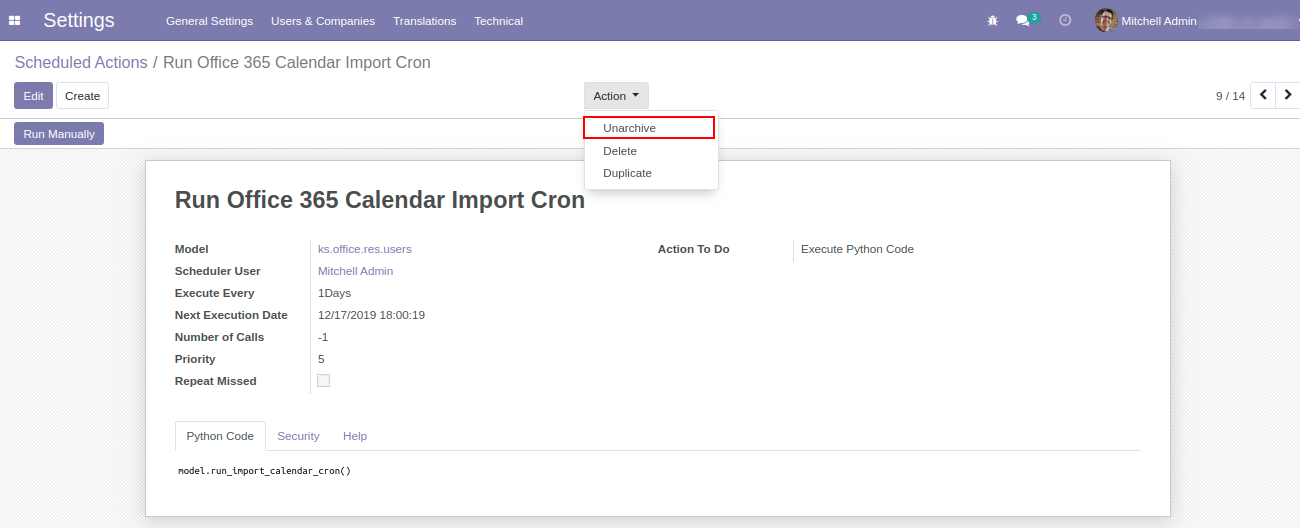
Now syncing for all the users will be performed after the given interval.
 choose required permissions and click Add permissions at the bottom.


In order to switch the permission, chose the permissions as per you choice.
Note: You must provide both Read and ReadWrite permission for your apps.

This is how the permissions will look like:

 Once you installed the Base module, now go to Settings > Users & Companies > your-admin-account. In Access Rights set ‘Office365 Rights’ to ‘Office365 Manager’ and refresh the page. (Only manager has the right to authenticate the connector, other users will just sync their record).


Access Rights must be given according to the User access. Manager level access can access Office 365 settings and authentication.

User with office365 User can only allowed for syncing.

 Go to Users & Companies > Office365 Settings and set Client ID,
Client Secret and Redirect URL (all these are already generated from
the azure portal just paste them here) and click save.


You will be asked to give permission for the apps you have installed with this base module. Click on the Yes button in order to proceed further.

Click on the office365 menu > Logs menu , It will display as Token generated successfully.

 You must set your timezone in order to match the timings of calendar events.
You can do so by clicking on your Profile > Preference. Then you can set your
timezone and then click on the Save button.


 You will have multiple filters to sync the events, there will be two options to
sync events on both sides. Firstly you have to choose the key fields to sync,
it is highly recommended to choose those fields that uniquely identify each event.
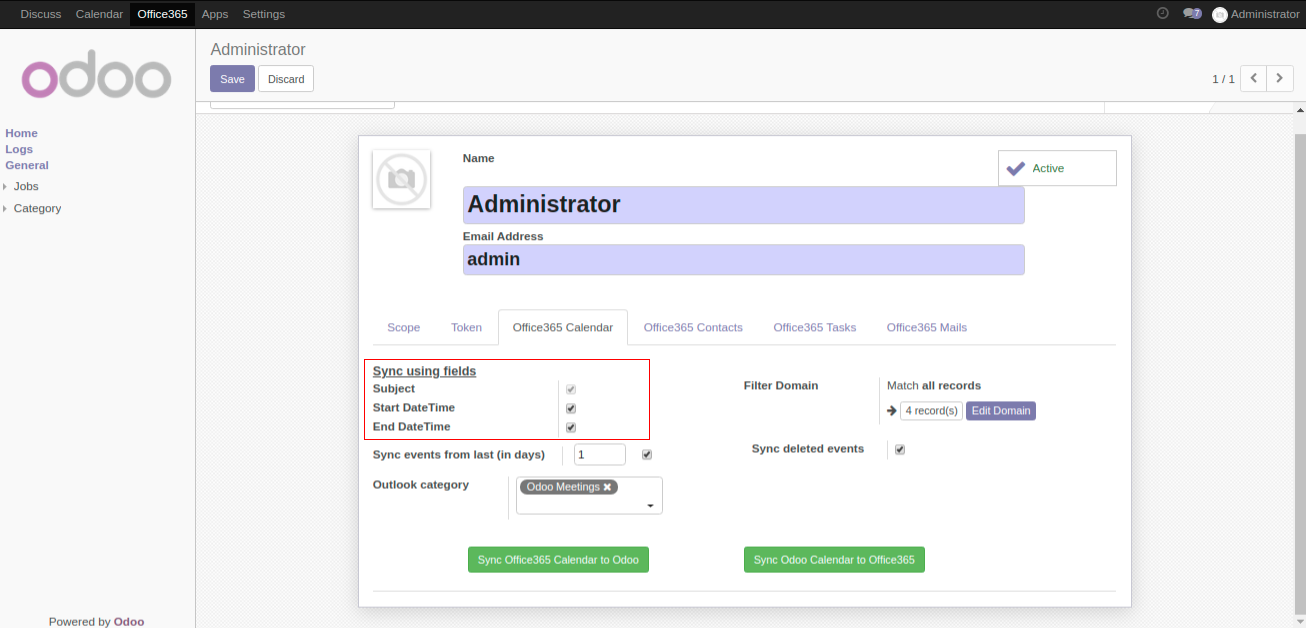
If you wish to sync only latest events, then you need to input the days in order to sync those events.
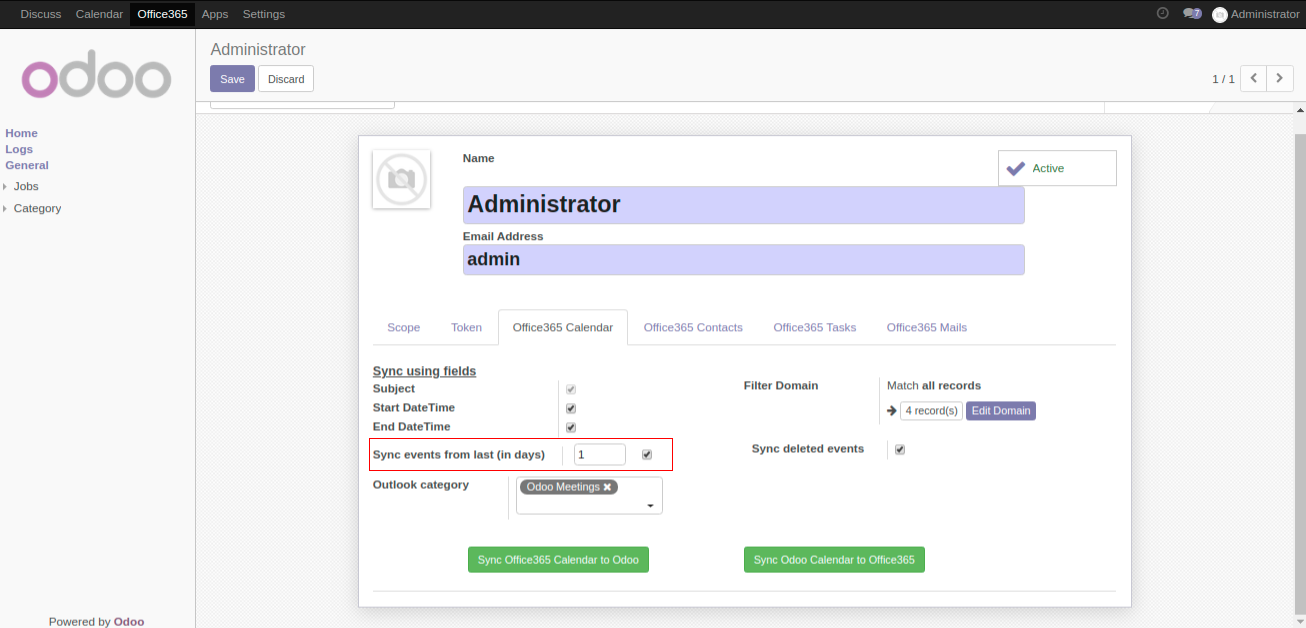
Further, if you wish to filter your events then you can choose a domain filter to view your results. This is only applicable from Odoo to Office 365.
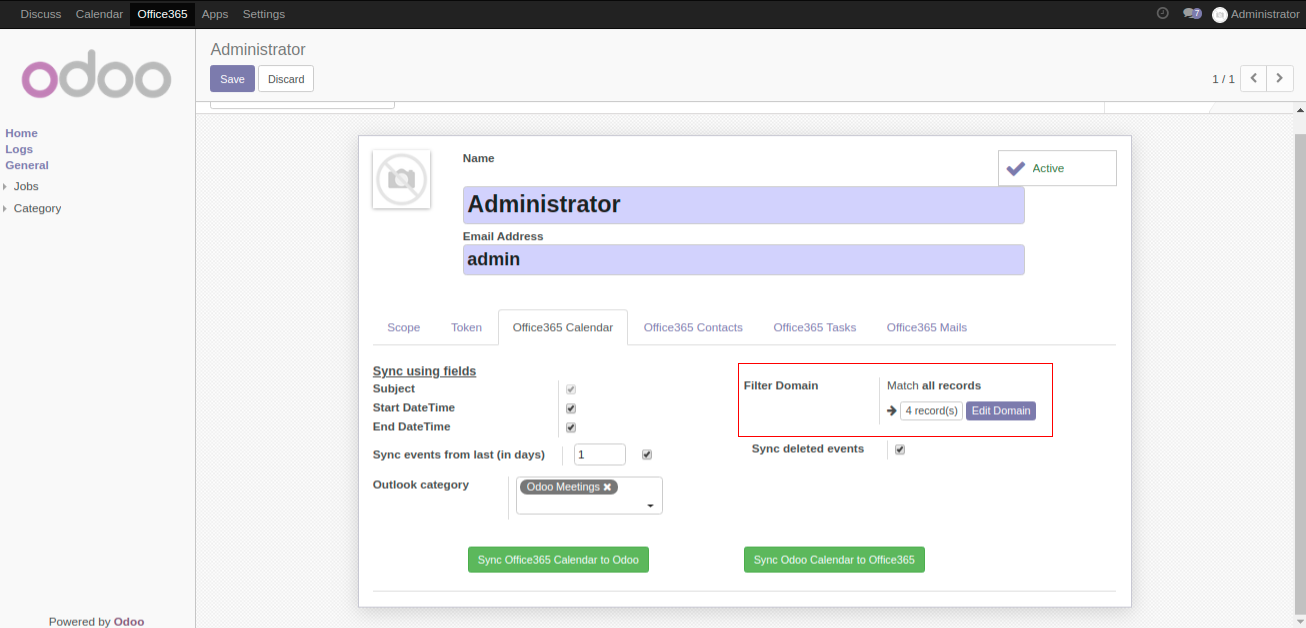
If you wish to sync deleted meetings as well you can choose the below checkbox.

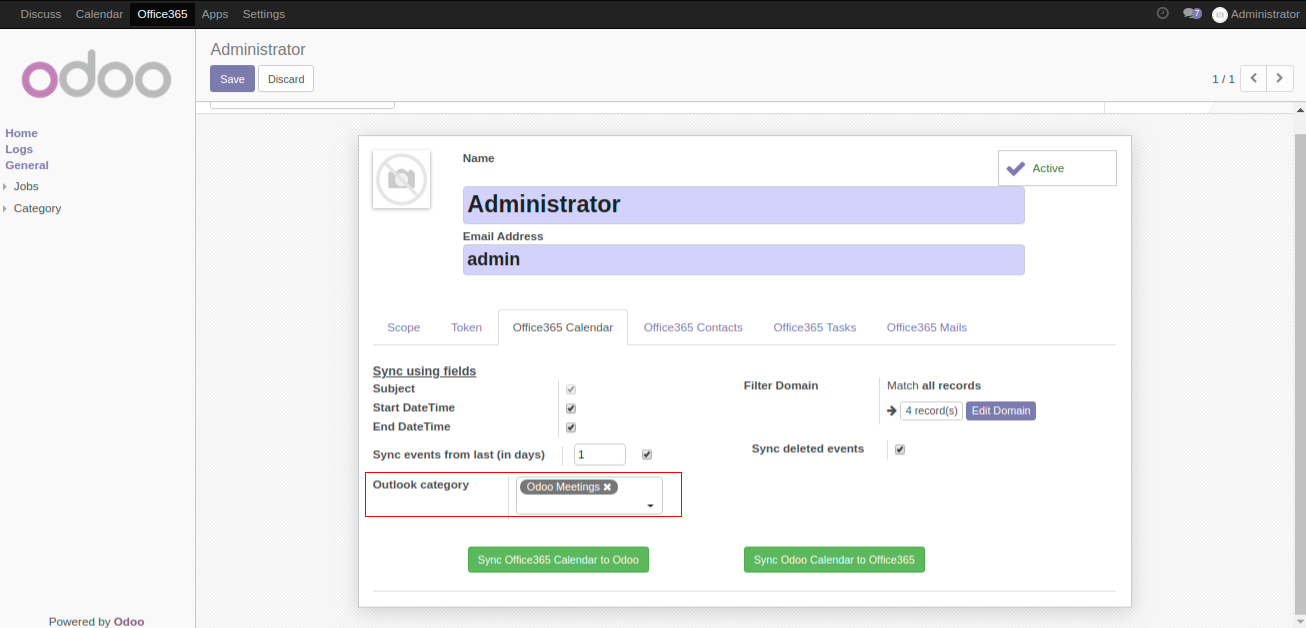
You can also sync meeting from a perticular category using below feature.
Next you can choose appropriate syncing direction.
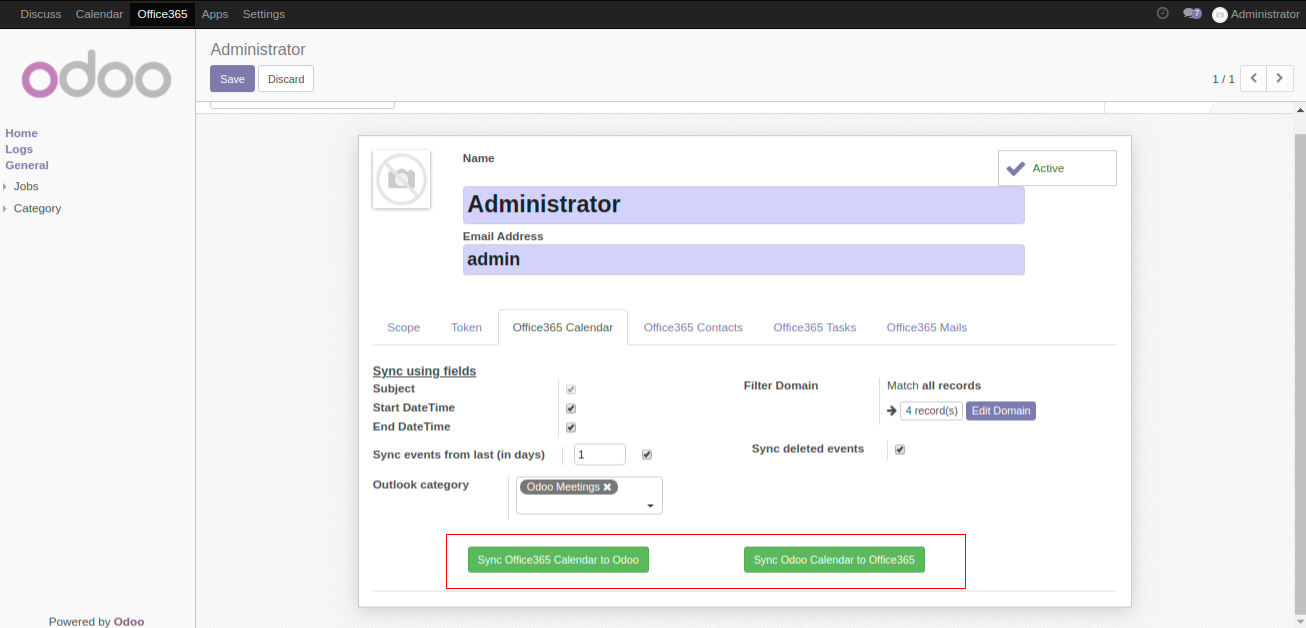
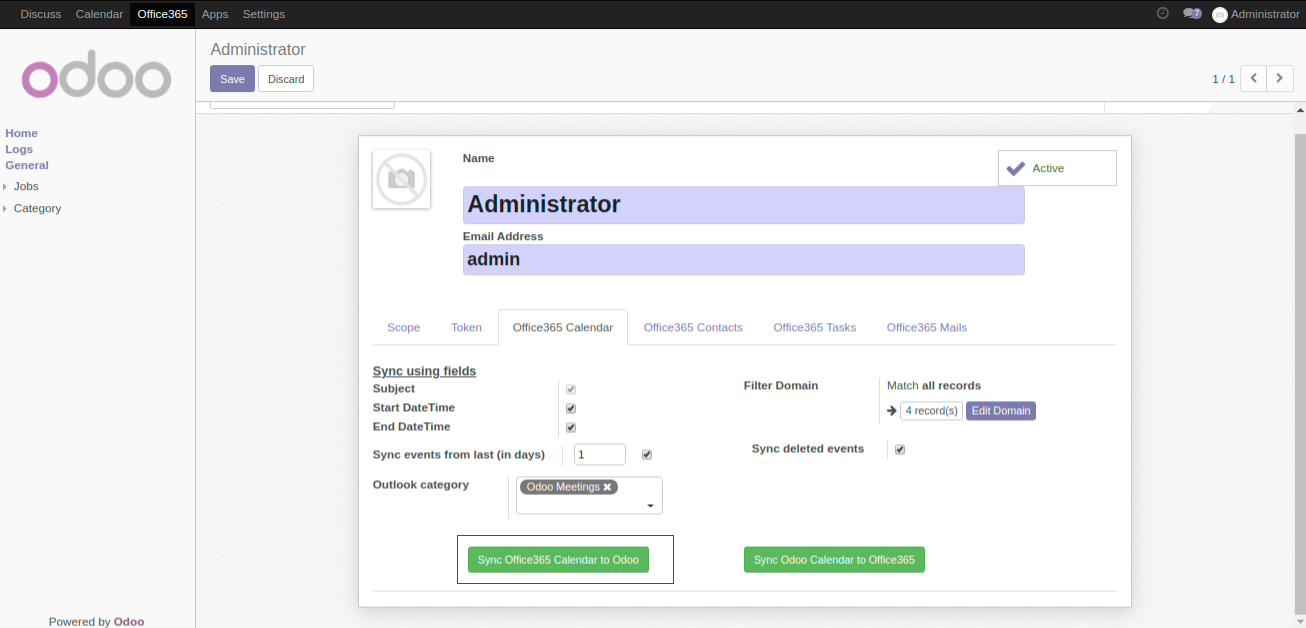

 You will be redirected to the logs with details of all the events that are synced.

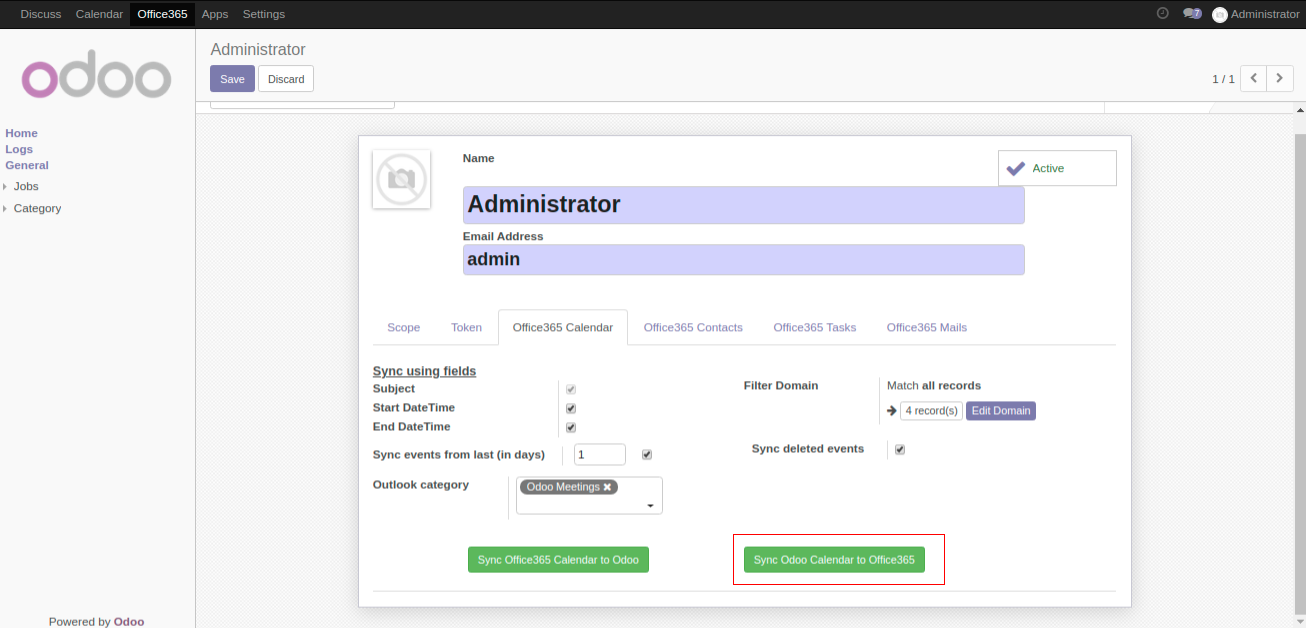

 You will be redirected to the logs with details of all the events that are synced.

 For any unsuccessful job, you can see how many records are processed and the
corresponding reasons for the failures.

 Syncing will resume from the last record processed, and if you want to sync
all over again you can delete the entry and start syncing.
 You can manually sync your calendar events or you can activate cron to do
syncing automatically. Automatic syncing will first sync your odoo events to
Microsoft events and then vice-versa.
 Go to Settings, and then Activate the developer mode.

You will see two crons 'Run Office 365 Import Cron' and 'Run Office 365 Export Cron' for importing and exporting respectively.
If you wish to export Odoo calendar events to Microsoft calendar automatically, click on 'Run Office 365 Export Cron'.

You can activate the cron by clicking the Off button, as shown below

If you wish to import Microsoft calendar events to Odoo calendar automatically, click on 'Run Office 365 Import Cron'.

You can activate the cron by clicking the Off button, as shown below

Now syncing for all the users will be performed after the given interval.
Screenshots
Our Releases
Latest Release 1.1.3
■ Improvement - Import Events Without Name from Outlook to Odoo.
Release 1.1.2
■ Fix - Show Login user data on domain.
Release 1.1.1
■ Improvement - Warning removed from logs.
Release 1.1.0
■ Improvement - Scope Functionality for user with different rights.
Release 1.0.9
■ Fix - Non-English language issue while syncing using cron.
Release 1.0.8
■ Fix - Issue while exporting meeting with negative timezone.
Release 1.0.8
■ Fix - Issue while exporting meeting with negative timezone.
Release 1.0.7
■ Fix - Only 255 description character are imported from Outlook.
■ Fix - Meeting "show as" is set to busy if it is other than free or busy in Outlook.
Release 1.0.6
■ Fix - User has the ability to restrict creation of invitation mail while creating or updating meeting at the time of syncing.
Release 1.0.5
■ Fix - Responsible person may not be the organiser of the meeting.
■ Fix - Attendee invitation mail generated every time meeting is imported.
■ Enhancement - Code Optimization.
Release 1.0.4
■ Enhancement - Realtime syncing optimized.
Release 1.0.3
■ Fix - Syncing recurring events with no end date
■ Fix - Portal user able to sync while syncing through cron
■ Fix - User able to sync meetings that he is not attending
Release 1.0.2
■ Fix- Recurrent event rescheduling error while updating rrule
■ Feature - Ability to sync deleted events
Release 1.0.1
■ Fix - Created separate cron for importing and exporting calendar events
User Guide
Frequently Asked Question
Yes, our app works with Odoo Enterprise as well as Community.
Please drop email at sales@ksolves.com or raise a ticket through Odoo store itself.
Yes, we do provide free support for 120 days for any queries or any bug/issue fixing.
No, multi-company is not supported.
Ksolves will provide FREE 120 days support for any doubt, queries, and bug fixing (excluding data recovery) or any type of issues related to this module. This is applicable from the date of purchase.
Note:
Extensively Tested on Odoo Vanilla with Ubuntu OS
Ksolves Suggested Apps

Ksolves Odoo Services


Odoo Implementation

Odoo Community Apps

Odoo Support & Maintenance

Odoo Customization

Odoo Integration Services

Odoo Developer Outsourcing
 sales@ksolves.com


Free 120 Days Support
Get 120 days of FREE support (doubt, queries,
& bug fixing)
on Odoo
applications from the date of purchase. Enhance the functionality of
your business with the Ksolves Odoo experts.

